

BIZOMAT Finance
How to use Finance
Step by step, from your first workspace to reports, GST and your team. Every button and field is named as it appears in the application.
Step 1 of 17
Sign in or create an account
Open Finance
Go to bizomat.ai/finance, or choose Sign in, then Finance, at the top of any BIZOMAT page.
Sign in
Use your BIZOMAT email and password. If you use Project Management or the CRM, it is the same account, and signing in to one signs you in to all three.
New to BIZOMAT?
Choose Create an account and enter your full name, work email and a password. If BIZOMAT asks you to confirm your email address, open the link in the email it sends, then sign in.
Step 2 of 17
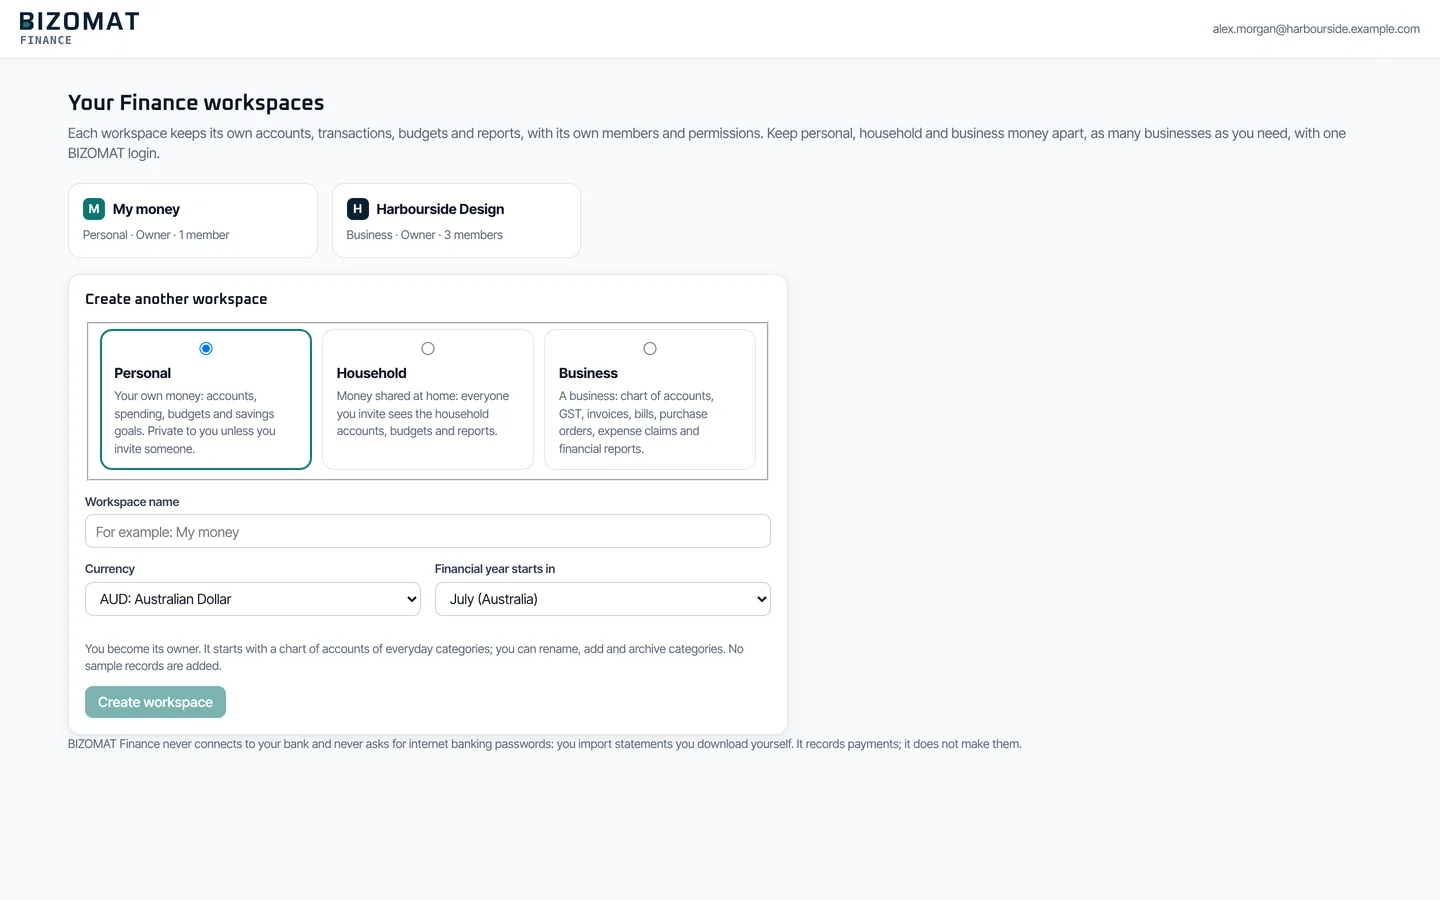
Create a workspace
A workspace keeps one set of books: its own accounts, records, members and settings. Keep personal, household and business money apart, and add as many businesses as you need.
Choose the kind
Personal for your own money, Household for money shared at home, Business for a business. The kind decides the starting categories and which features appear.
Name it
Enter the Workspace name, the Currency (Australian dollars unless you choose otherwise) and the month your Financial year starts in (July in Australia).
For a business
Add the Legal name and ABN, and tick Registered for GST if the business is. The standard Australian tax codes are always there; GST is worked out once registration is on.
Create workspace
You become its owner. It starts with a chart of accounts and no sample records.
Switch workspaces
Open the workspace menu at the top left to move between workspaces, or choose Create or join a workspace.
Step 3 of 17
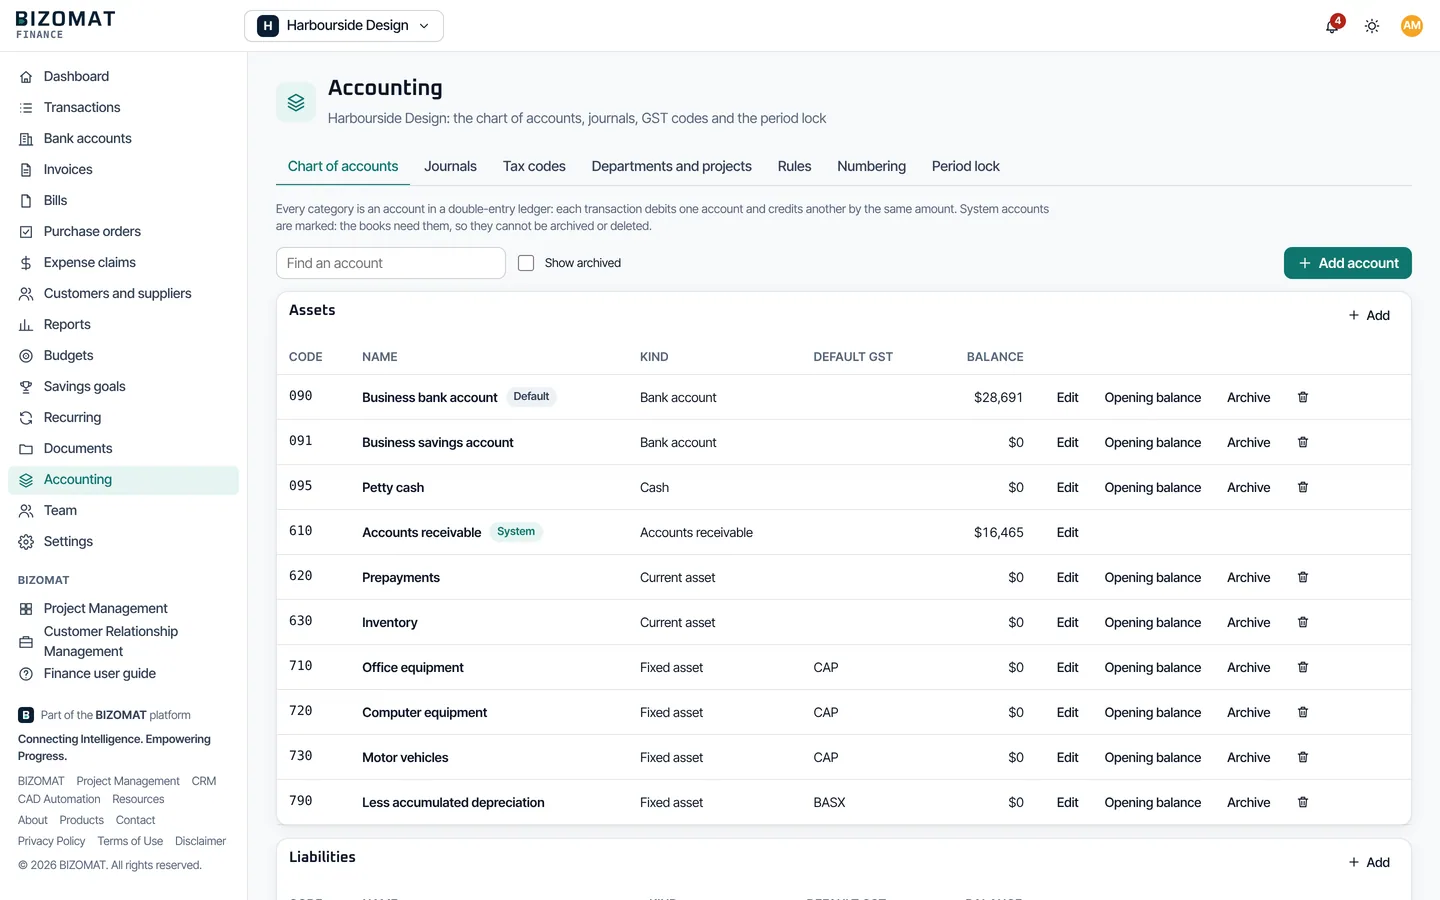
Set up your accounts and categories
Money accounts are where money sits or is owed: bank accounts, cash, credit cards and loans. Categories (income and expense accounts) say what money was for.
Add your bank accounts and cards
Open Bank accounts and choose Add an account. Choose the kind, name it, add the bank details if you like, and enter the balance on a starting date. For a card or loan, enter what is owed.
Adjust the categories
Open Accounting, Chart of accounts (Categories and accounts in a personal or household workspace). Choose Add account, give it a code and a kind, or put it under a parent as a sub-category. Edit renames it or moves it.
Archive what you do not use
Archive hides an account with a zero balance; an account never used can be deleted. Accounts the books need, such as GST and accounts receivable, are marked and kept.
Departments and projects
In a business, Accounting, Departments and projects adds departments, projects and cost centres. Each line of a transaction or invoice can carry one, and reports can be filtered by them.
Step 4 of 17
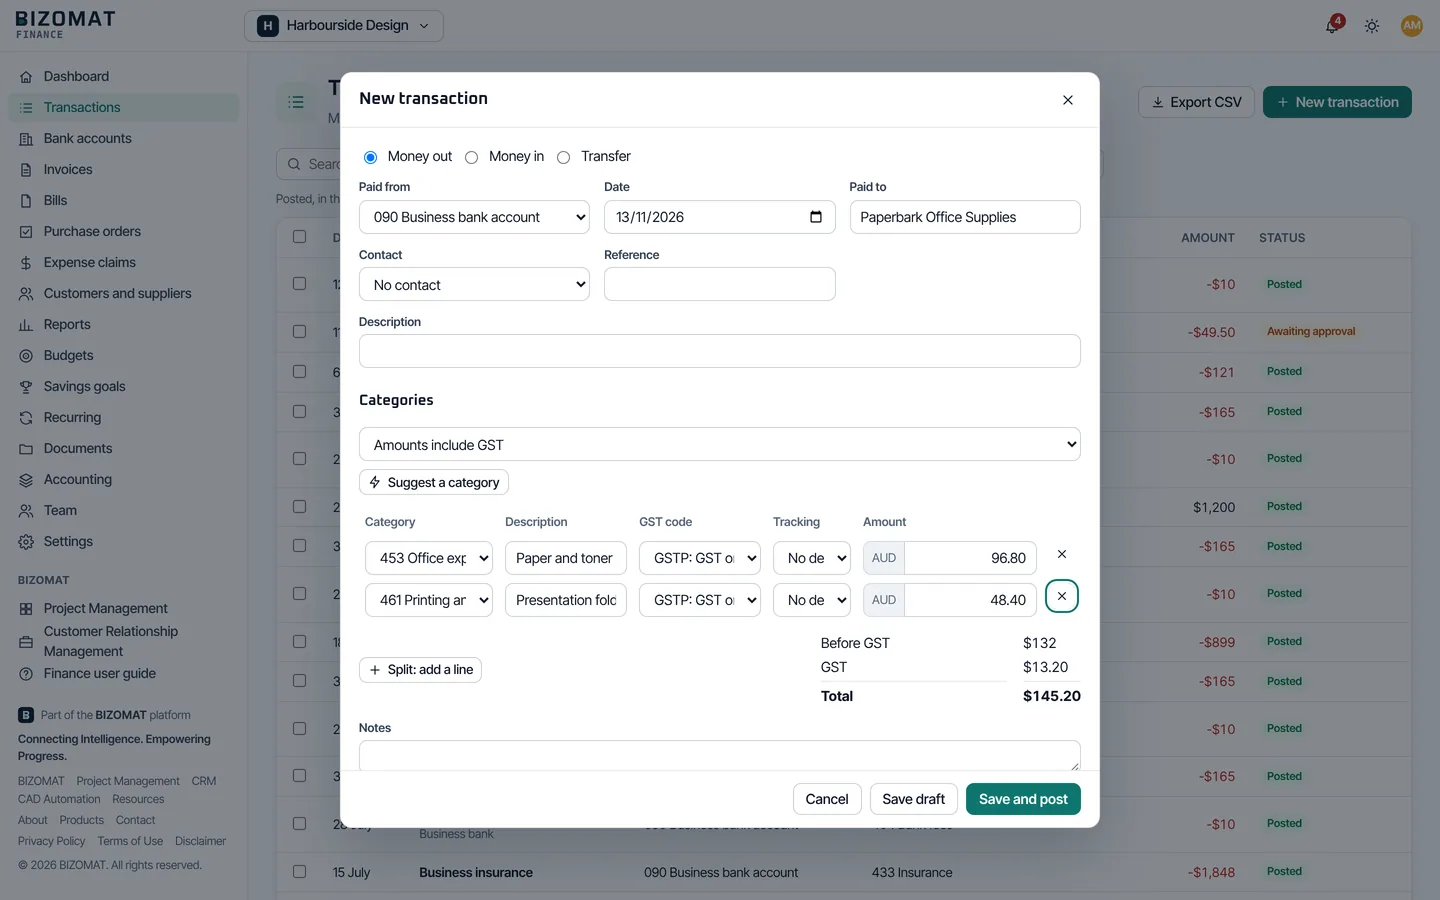
Record money in, money out and transfers
New transaction
Open Transactions and choose New transaction. Choose Money out, Money in or Transfer, the account it was Paid from or Paid into, the date and who it was Paid to or Received from.
Category and amount
Choose the category and enter the amount. In a GST workspace, choose whether amounts include GST and the GST code of each line; the GST and total are worked out for you.
Split it
One payment for several things? Choose Split: add a line and give each line its own category and amount.
Suggestions
Suggest a category offers the category from your rules or from what you chose before for the same payee. Nothing is applied until you choose Use.
Save
Save and post records it in the books. Save draft keeps it for later. In a business, a contributor's transaction is sent for approval instead (Submit for approval).
Possible duplicates
If the same amount was recorded on the same account a few days either side, Finance shows it before saving. Choose Save anyway if it is not a duplicate.
Receipts and changes
Open a transaction to attach a receipt, see its history, change it or void it. A posted transaction is never edited in place: the change reverses the old entry and posts the new one.
Step 5 of 17
Import a bank statement
Finance never connects to your bank and never asks for your internet banking password. You download the statement from your bank and upload it.
Download it from your bank
Most banks offer CSV, OFX and QIF files in internet banking. OFX and QIF need no setting up.
Upload it
Open Bank accounts, choose Statement and reconcile on the account, then Import a statement. Choose the file.
Check the columns
For a CSV file, Finance shows its columns and guesses which is the date, the amount (or money in and money out), the description and the reference. Change any that are wrong and choose the date format.
Import
Lines already imported are skipped, so importing an overlapping statement again adds only the new lines.
Step 6 of 17
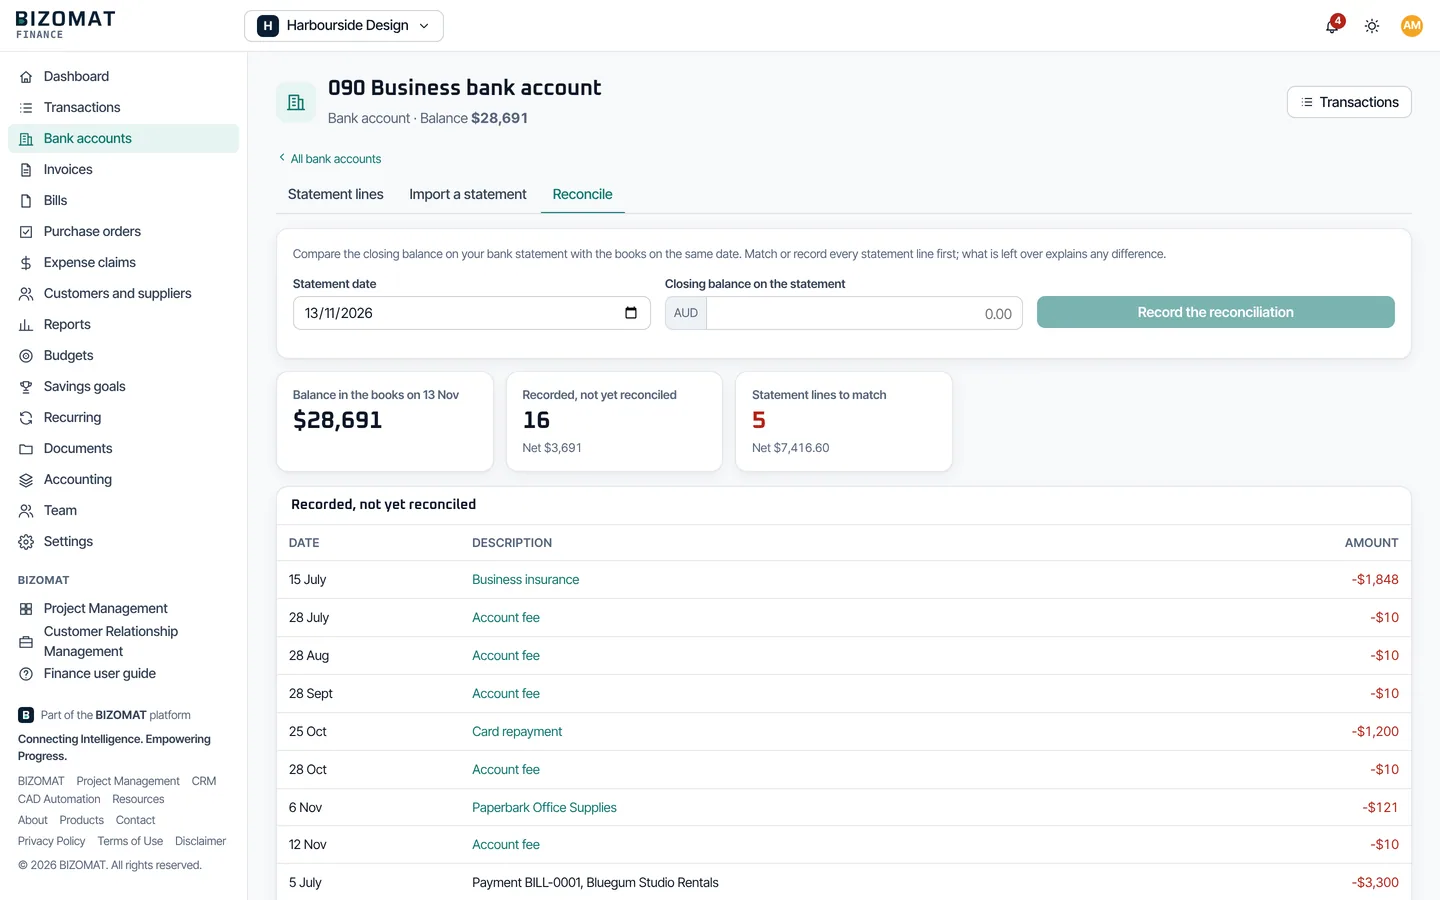
Match the lines and reconcile
To match
Statement lines, To match lists each line from the bank. When Finance finds a transaction or payment you already recorded with the same amount and a nearby date, choose Match.
Record it
For a line not yet recorded, choose Record it: pick the category (or the other account of a transfer) and Finance records, posts and matches it in one step. Tick Remember to make a rule, so the next line from that payee is suggested the same category.
Ignore
Ignore sets aside a line that should not be in the books; it can be restored. Unmatch undoes a match.
Reconcile
On the Reconcile tab, enter the statement date and the closing balance on the statement, then Record the reconciliation. Finance shows the difference from the books and what is not yet reconciled.
Step 7 of 17
Quote, and let the customer accept online
New quote
Open Quotes and choose New quote. Choose the customer, or From the CRM to use a company from your CRM (it becomes one customer in Finance, never a second). Set Valid until; quotes are valid for 30 days unless you change it.
Lines
Add a line for each item, with a code, quantity, unit, unit price and discount. Add a heading to group lines, and tick Optional for extras the customer may take: they show in brackets and are not in the total. A Discount on the whole quote comes off every line before GST.
Preview
The preview is the quote exactly as its PDF, on A4, and updates as you type. On a wide screen it sits beside the form; otherwise choose Preview.
Send it
Get a link gives a secure online link for the customer; Email sends it, when email is set up; Mark as sent records that you sent it yourself. Each version is kept exactly as it was sent.
The customer answers
From the link, the customer reads and downloads the quote and accepts it with their name, or declines it. You see when they opened it. Record acceptance or Record a decline keeps an answer given another way.
Change a sent quote
Edit after sending keeps the version the customer saw and starts the next version as a draft; the old link stops working until you send again.
Invoice it
On an accepted quote, choose Create invoice: all of it, or a percentage for progress invoicing, with the optional lines the customer took. Every part is a draft invoice; the parts' amounts add up to the quote exactly, with GST worked out on each invoice.
Step 8 of 17
Invoice your customers
Customers and suppliers
Open Customers and suppliers and choose New contact, or Import CSV to bring in a list. Payment terms set each customer's due dates; a default account and GST code fill in new lines.
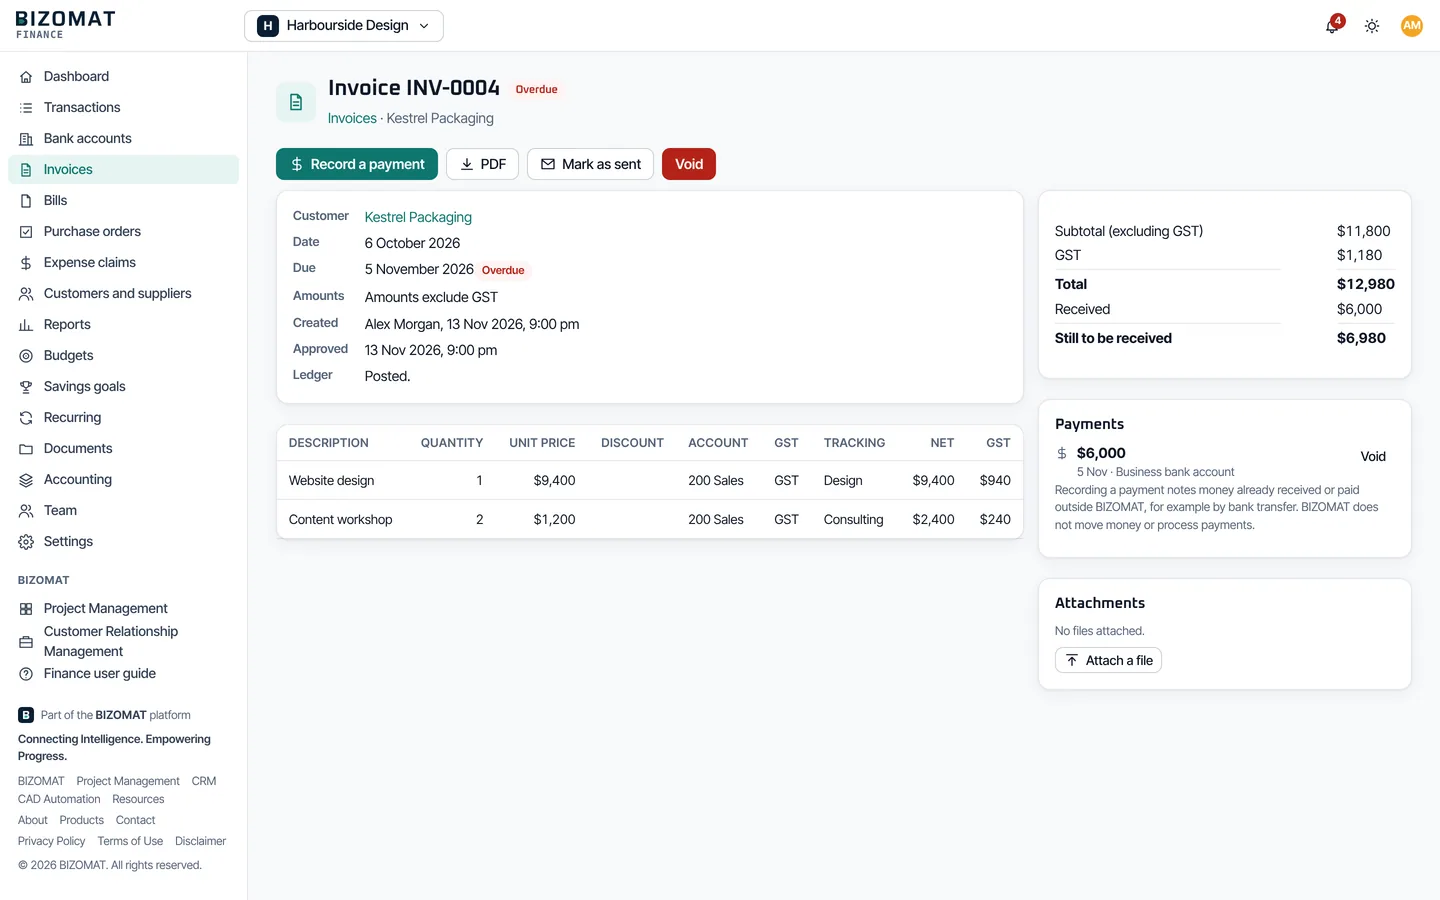
New invoice
Open Invoices and choose New invoice. Choose the customer; the number is given automatically unless you type one. Add lines with a code, description, quantity, unit, unit price, discount and account; the account's GST code fills in. Headings, a whole-invoice discount, a delivery address and the salesperson are there too, with the same live preview.
Approve
Save and approve (post to the ledger) records what the customer owes you. Save as draft keeps it for later.
Send it
Get a link or Email gives the customer a secure online copy; PDF downloads it to send yourself, then Mark as sent. In a business registered for GST, the PDF is titled Tax invoice and shows your ABN and the GST. Opening the link never marks an invoice paid.
Get paid
When the money arrives, choose Record a payment: the date, the account it went into and the amount. A smaller amount records a part payment. Finance records payments; it does not collect them.
Credit notes
Choose Credit note on an approved invoice: its lines fill in, to credit all or part of it. Approving posts it, lowering income and GST, and applies the credit to the invoice. Credit without an invoice stays with the customer: Apply to an invoice later, or Record a refund when you pay it back.
Overdue
Invoices past their due date are marked Overdue, appear on the dashboard and in Aged receivables, and the people who look after sales are reminded.
Templates
Settings, Document templates: page layout, typeface, colour, titles, how to pay, default terms, signature lines on quotes and the remittance slip on invoices, with a sample to see the result.
Step 9 of 17
Bills, purchase orders and expense claims
Bills
Open Bills and choose New bill when a supplier's bill arrives. Approve it to record what you owe, attach the bill, and Record a payment when you pay it.
Purchase orders
Purchase orders record what you have ordered. Approve the order, and when the goods and bill arrive, choose Convert to bill.
Expense claims
Staff record what they paid for the business under Expense claims, with the receipt. A claim waits for approval; once approved and reimbursed, Record a payment closes it.
Approvals
In a business, a contributor's bills and claims wait for someone who may approve them. They see them under Awaiting approval and can approve or return them for changes with a note.
Step 10 of 17
Read the dashboard and the reports
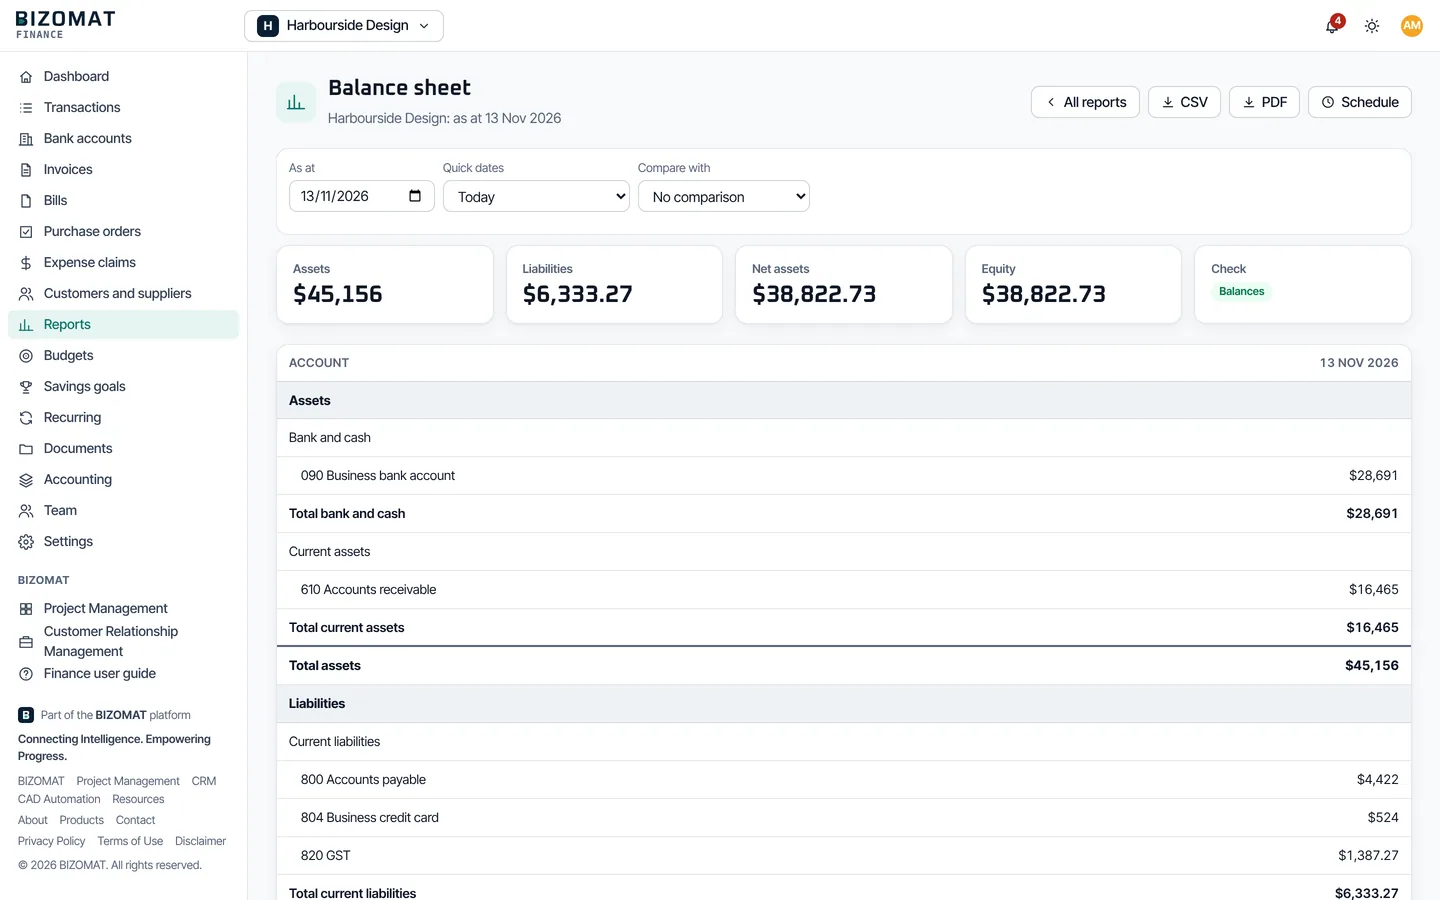
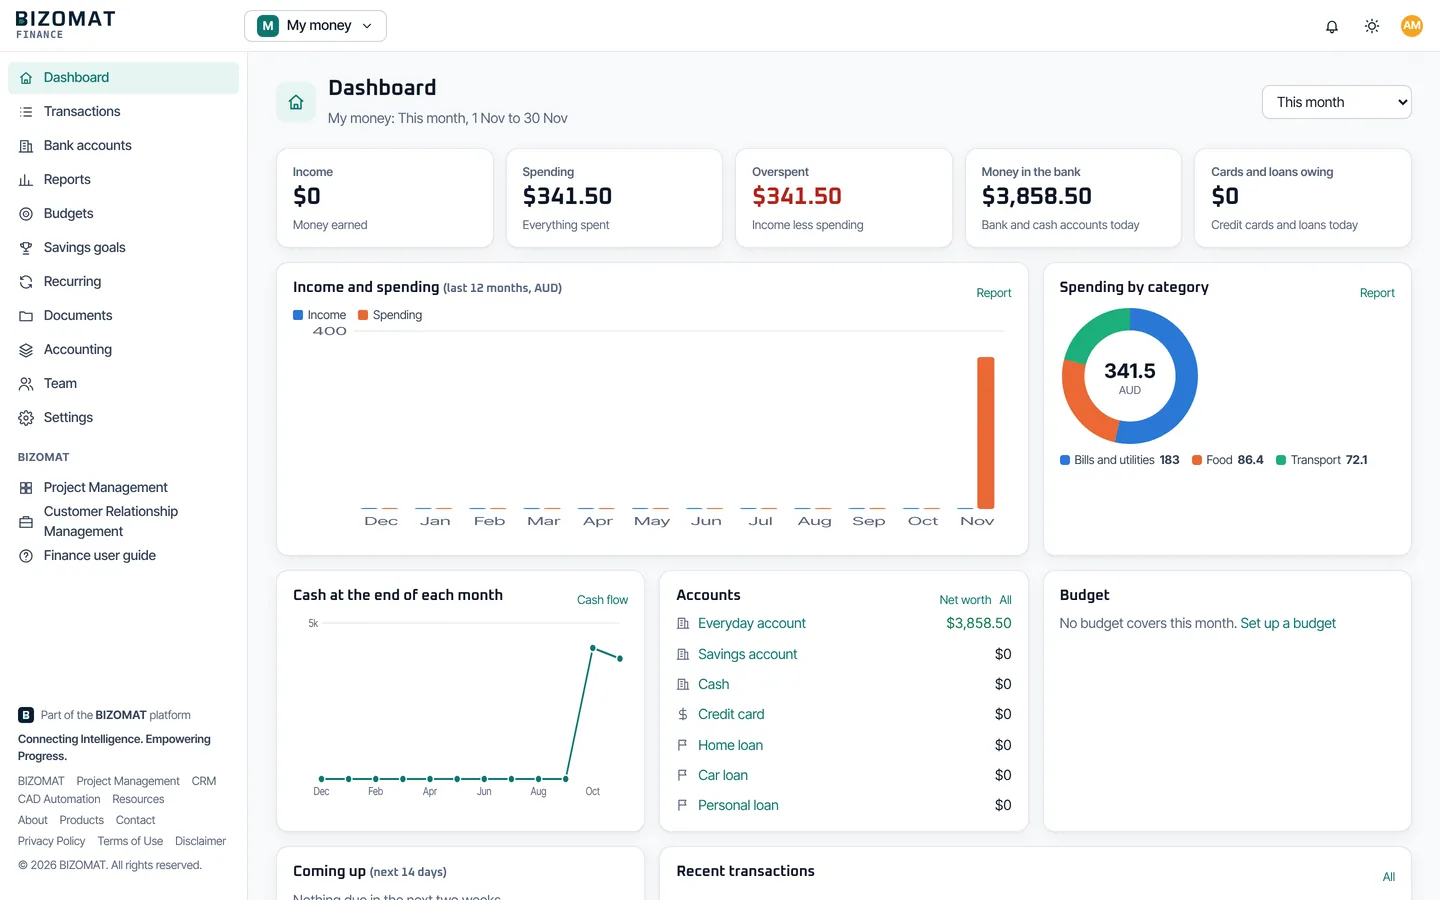
Every figure comes from the posted entries in the books, worked out when you open it.
The dashboard
Income, expenses and net profit for the period you choose, cash, cards and loans, what is owed to you and what you owe, approvals waiting, statement lines to match, a 12-month chart, spending by category, the budget and what falls due soon.
12 reports
Open Reports: Profit and loss, balance sheet, cash flow statement, general ledger, trial balance, account transactions, income and expenses by month, budget against actual, cash flow forecast, aged receivables, aged payables and gST and BAS worksheet.
Choose what to see
Each report has its own dates or as-at date, a comparison with the previous period or year, and filters for department, project and cost centre (and person, in a household).
Export and schedule
CSV and PDF download the report. Schedule saves it each month or quarter in Documents, in the Reports folder.
Step 11 of 17
GST and the BAS worksheet
For Australian businesses registered for GST.
Settings
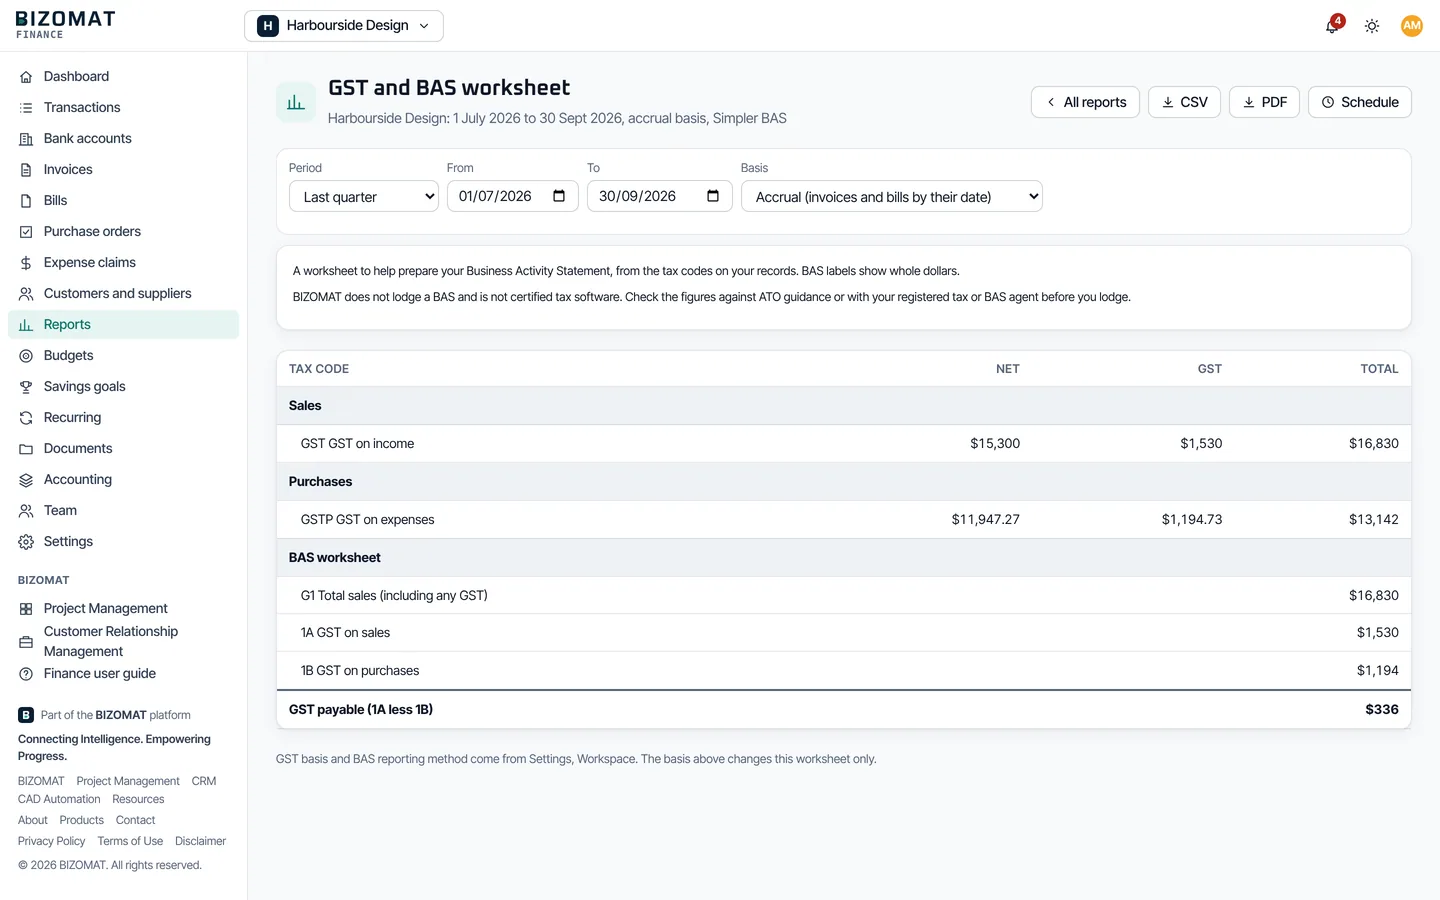
Settings, Workspace, GST: the accounting basis (cash: when paid; or accrual: when invoiced), the reporting period and the BAS reporting method (Simpler BAS with G1, 1A and 1B, or full reporting).
Tax codes
Accounting, Tax codes lists the codes: GST, FRE, EXP, ITS, GSTP, CAP, FREP, CAPF, ITP and BASX. Add your own or change their rates and BAS labels.
The worksheet
Reports, GST and BAS worksheet adds up GST by tax code and the BAS labels for a period, in whole dollars.
Before you lodge
It is a worksheet to check against your records. You or your registered tax or BAS agent lodge the BAS with the ATO; BIZOMAT does not lodge it.
Step 12 of 17
Budgets, savings goals and recurring payments
New budget
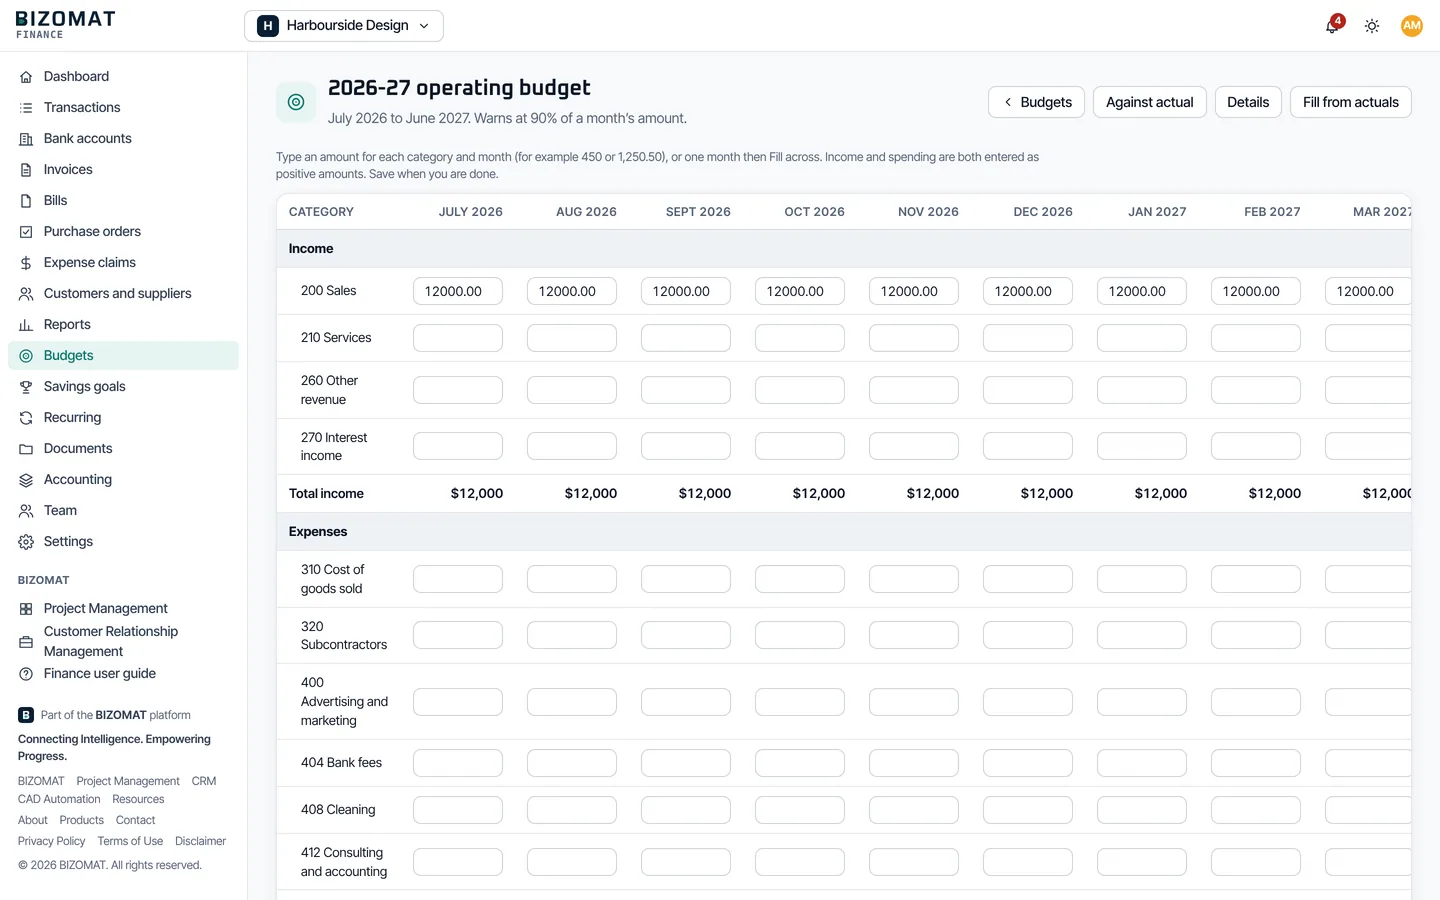
Open Budgets and choose New budget: a name, the first month and how many months, and if you like a department, project or cost centre and the warning level.
Fill it in
Type an amount for each category and month, or one month then Fill across. Fill from actuals copies what happened in the same months of an earlier year, with a percentage change. Save budget when you are done.
Against actual
Against actual opens the budget against actual report. Finance warns the people who manage budgets when a category nears its budget for the month.
Savings goals
Open Savings goals and choose New savings goal: a target, a date, and either the account the savings are in or the amount you keep track of yourself.
Recurring
Open Recurring and choose New recurring for rent, subscriptions or regular invoices and bills. They repeat weekly, fortnightly, monthly, quarterly and yearly, posted automatically or left as drafts to check. Run now creates the next one at once.
Step 13 of 17
Personal and household money
Your own money
A personal workspace uses everyday categories such as Groceries, Fuel and Electricity and gas, and calls the reports Income and spending and Net worth. Nobody else can see it until you invite them.
Shared at home
In a household workspace, everyone you invite sees the household accounts, budgets and reports and adds their own spending. Choose Whose money on a transaction, and filter reports by person to see each person's share or everyone's together.
Step 14 of 17
Receipts and documents
Upload
Open Documents and choose Upload documents. Put files in folders and link them to an account; search finds them by name and folder.
Attached to records
Receipts attached to a transaction, invoice or bill appear with it and in Documents, with a link back. Only people who can see that record can open them.
Versions
New version replaces a file and keeps the earlier ones; Versions lists them.
Step 15 of 17
Invite people and choose roles
Invite someone
Open Team, then Invitations. Enter the person's email address, choose their role, add a message if you like, and choose Send invitation.
Email or link
BIZOMAT emails the invitation when its email service is set up. Either way, Team shows the invitation link with Copy, so you can send it yourself. The link works once, for 14 days, and only for that address.
Members
Under Members, change a person's role or remove them. The owner can Transfer ownership; anyone else can leave.
Roles and permissions
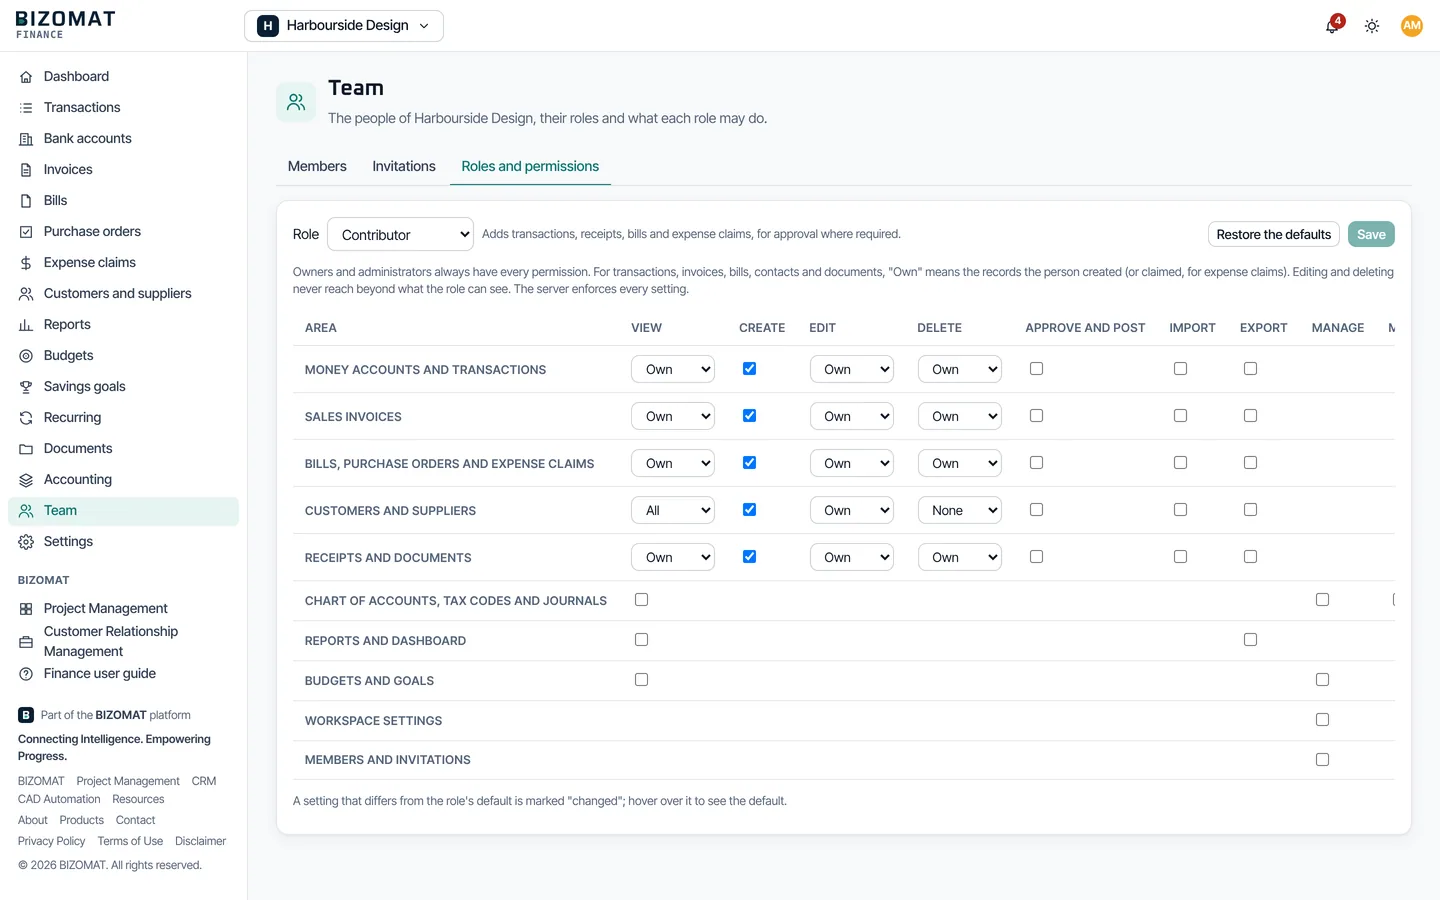
Owners and administrators can change what Accountant, Finance Manager, Contributor and Viewer may do: for each area, View, Edit and Delete as All, Own or None, and Create, Approve and post, Import and Export. Restore the defaults undoes the changes.
The 6 roles
- Owner: Complete control of the workspace, including ownership and deletion.
- Administrator: Manages members, permissions, settings and every financial record.
- Accountant: Keeps the books: every record, the chart of accounts, tax codes, journals and the period lock.
- Finance Manager: Runs day-to-day finance: transactions, invoices, bills, approvals, budgets and reports.
- Contributor: Adds transactions, receipts, bills and expense claims, for approval where required.
- Viewer: Reads the records and reports the workspace allows, and changes nothing.
Owners and administrators always have every permission.
Step 16 of 17
Correct mistakes and close a period
Change or void
Open the transaction, invoice or bill and change it, or Void it. Finance reverses the original entry and posts the new one, so the books keep both.
Manual journals
Accountants can post adjustments in Accounting, Journals with New manual journal. Debits must equal credits before Post journal works. Reverse undoes a manual journal on a date you choose.
Lock a period
Accounting, Period lock sets the lock date, for example once a BAS is lodged or a year is closed. Nothing can be posted, changed or voided on or before it; a correction goes in a later period.
Step 17 of 17
Settings, notifications and the audit trail
Approvals and alerts
Settings, Approvals and alerts: whether contributors' records wait for approval, reminders before invoices and bills fall due, overdue reminders, budget warnings, the monthly summary and default payment terms.
My notifications
Choose for each kind of notification whether you get it In the app, By email, or both. The bell shows them in the workspace.
Audit trail
Settings, Audit trail lists who changed what: records, approvals, imports, exports, members and permissions.
Delete the workspace
The owner, in Settings, Delete workspace, after typing its name. Every member loses access at once.
Common questions
Before you ask
- Does Finance connect to my bank?
- No. It never connects to a bank and never asks for your internet banking password. Download a statement from your bank and import it.
- Can I pay bills or take payments in Finance?
- No. Record a payment notes money you have already received or paid. Finance does not move money.
- Can I lodge my BAS from Finance?
- No. The GST and BAS worksheet helps you prepare it. Check it against your records, and lodge with the ATO yourself or through your registered tax or BAS agent.
- Is it a certified accounting or payroll product?
- No. It is not certified for tax, payroll or statutory accounting, and it does not do payroll, PAYG withholding or superannuation.
- Who can see my personal workspace?
- Only you, until you invite someone. People outside a workspace cannot see it or tell that it exists.
- Can I run more than one business?
- Yes. Create a workspace for each, and switch between them from the workspace menu. Each keeps its own books, people and settings.
- Is it the same account as Project Management and the CRM?
- Yes. One BIZOMAT account signs you in to all three, and each keeps its own data.
- Can a workspace use more than one currency?
- No. Each workspace has one currency, chosen when you create it; it can be changed until anything is posted.
Something not covered here? Contact BIZOMAT.