

BIZOMAT Engineering Automation · Engineering Automation System · User guide
How to use BIZOMAT Engineering Automation
Step by step, from your CAD Automation account to a paired computer, a connected assistant, your first part, drawings and exports, and BIZOMAT ERP. Every page and button is named as it appears in CAD Automation.
CAD Automation has its own sign-in for now. Its setup and your company's computers are also in BIZOMAT ERP, under Products and Engineering. Detailed set-up and troubleshooting: the guide in CAD Automation.
- Live Works today in BIZOMAT.
- Connected Works today by linking two BIZOMAT systems, without copying records.
- In development Being built: parts exist, but it is not switched on for everyone yet.
- Planned Designed, not built. Not available today.
Step 1 of 13 Live
Open CAD Automation
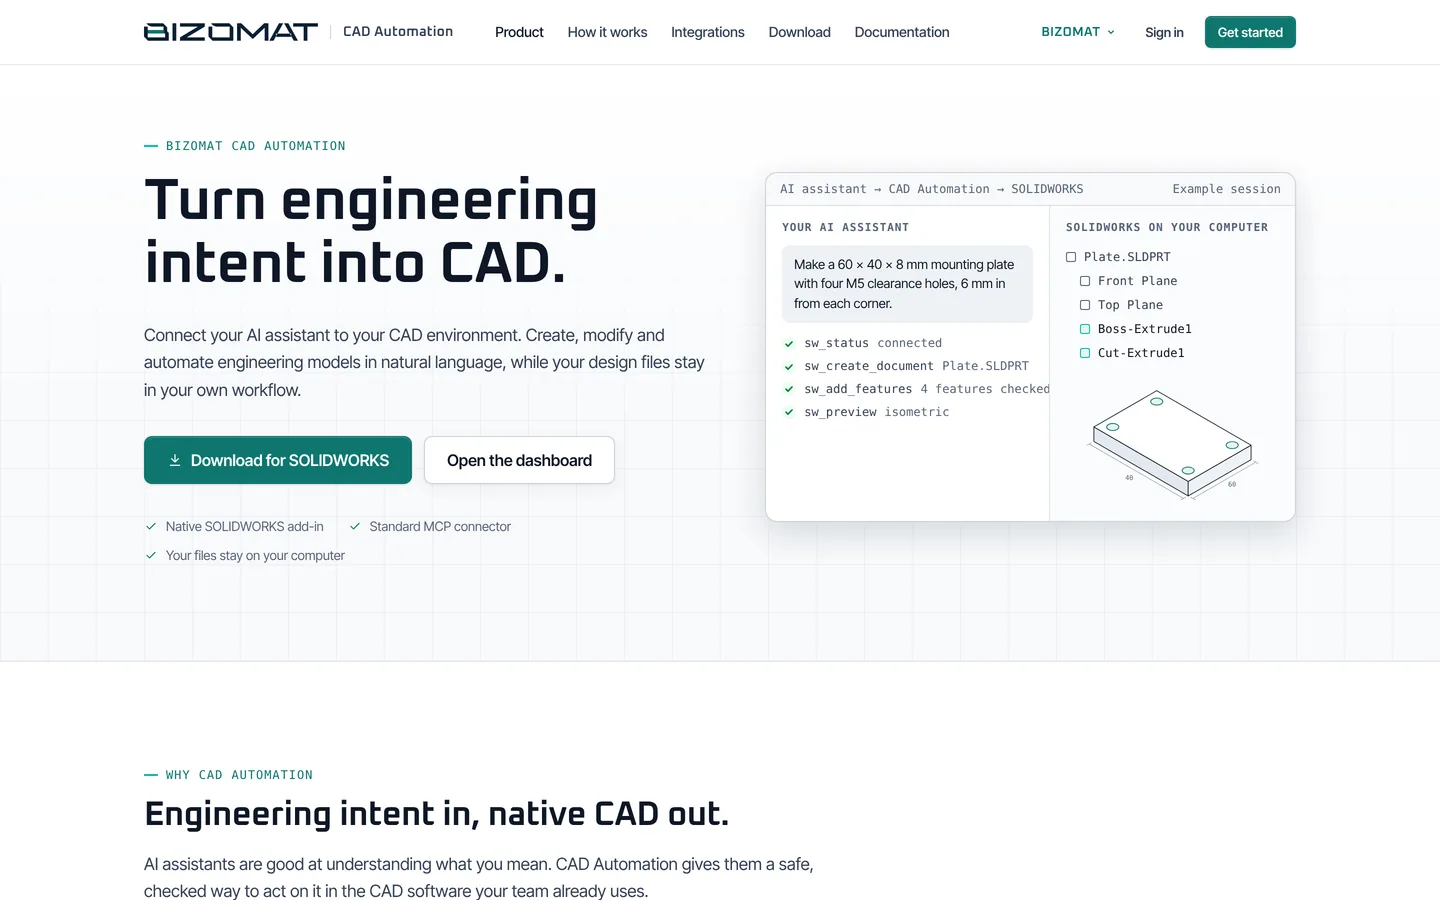
BIZOMAT Engineering Automation works through its application, CAD Automation, at bizomat.ai/cad. It was called CADOS before.
Go to CAD Automation
Open bizomat.ai/cad/. Its pages are Home, CAD Assistant, SOLIDWORKS, Tools, History and Settings, with Admin for the administrator.
Its own sign-in, for now
CAD Automation has its own accounts, separate from the BIZOMAT account you use for BIZOMAT ERP, Projects, the CRM and Finance.
Sign in with BIZOMATIn development
One BIZOMAT account for CAD Automation too is being built. Until it is switched on, use your CAD Automation account.
From BIZOMAT ERPConnected
In BIZOMAT ERP, Products and Engineering in the module rail shows the same four set-up steps, with links into CAD Automation. The last step of this guide covers it.
Step 2 of 13 Live
Check what you need
Everything runs in the SOLIDWORKS installed on your own Windows computer. Without a local SOLIDWORKS installation and its connection, the assistant has nothing to work in.
Windows
Windows 10 (version 1903 or later) or Windows 11, 64-bit, with .NET Framework 4.8, which is included in Windows.
SOLIDWORKS
SOLIDWORKS 2022 or later, 64-bit. The add-in is built against the SOLIDWORKS 2022 API; 2023 to 2026 are expected to work but are not yet validated. One add-in serves every version installed on the computer.
Not supported
SOLIDWORKS 2021 or older, 32-bit Windows or SOLIDWORKS, and SOLIDWORKS run as administrator. Windows Server is not tested.
Administrator approval
Once, on the computer, for the installation.
An account and an assistant
A CAD Automation account, and an AI assistant that supports remote MCP connectors, such as Claude, or ChatGPT where your plan allows custom connectors.
Step 3 of 13 Live
Sign in or get an account
Sign in
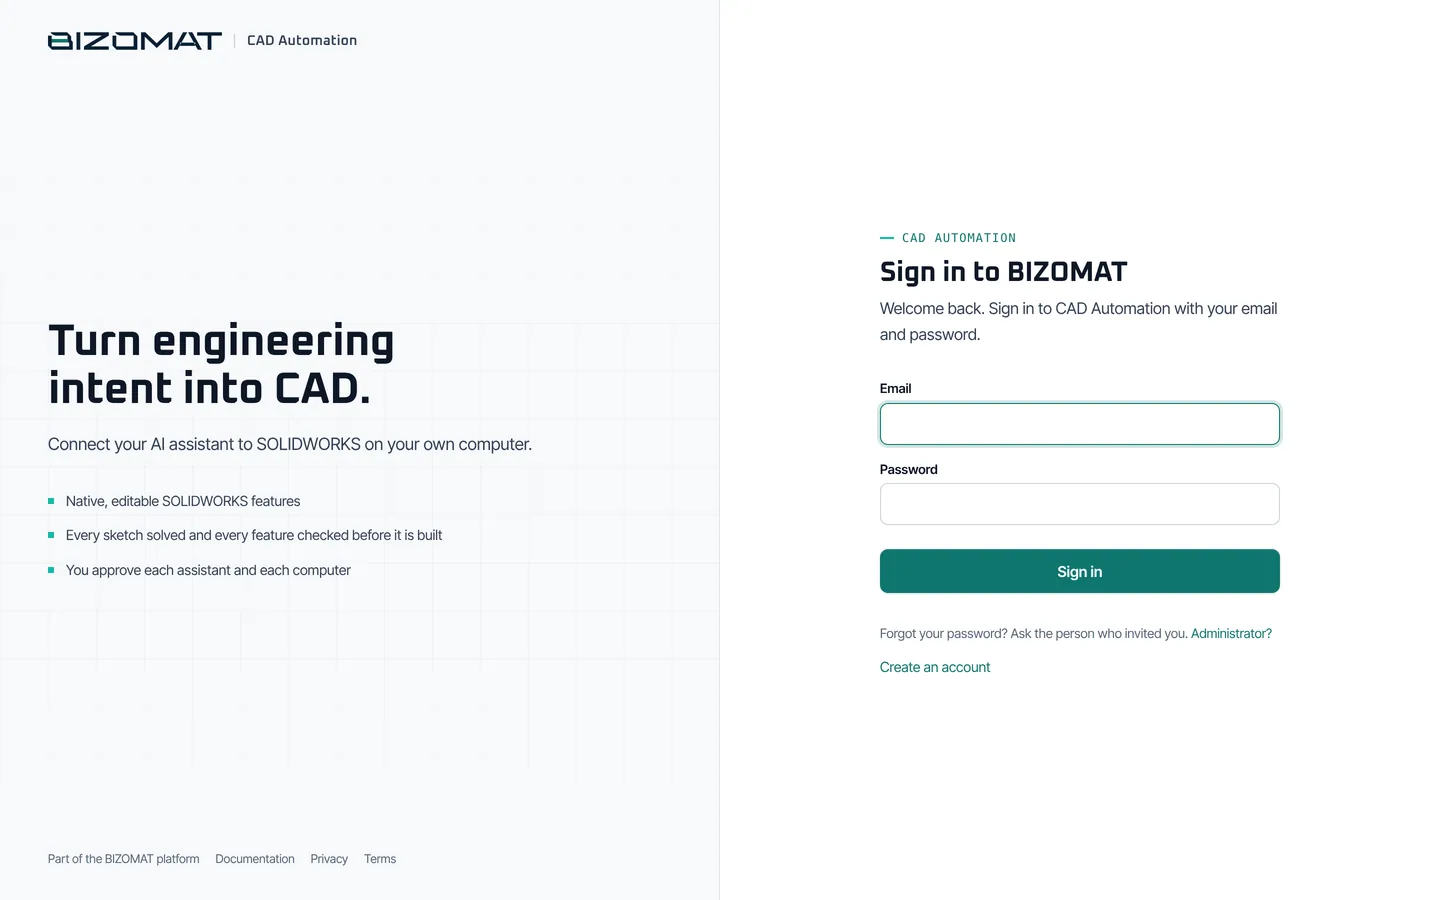
Open bizomat.ai/cad/login and enter the email and password of your CAD Automation account. Google sign-in appears where your administrator turned it on.
Getting an account
Your administrator adds you with a password, or sends an invite link so you choose your own. If the administrator has opened sign-up, you can create an account yourself.
A password made for you
If a strong password was filled in for you when you joined, Home shows it once: save it. You use it to sign in and in the Companion's pairing window. Choose your own any time in Settings.
Stay signed in
On the same browser you stay signed in for 90 days, and sign out from Settings.
Step 4 of 13 Live
Install on your Windows computer
Download
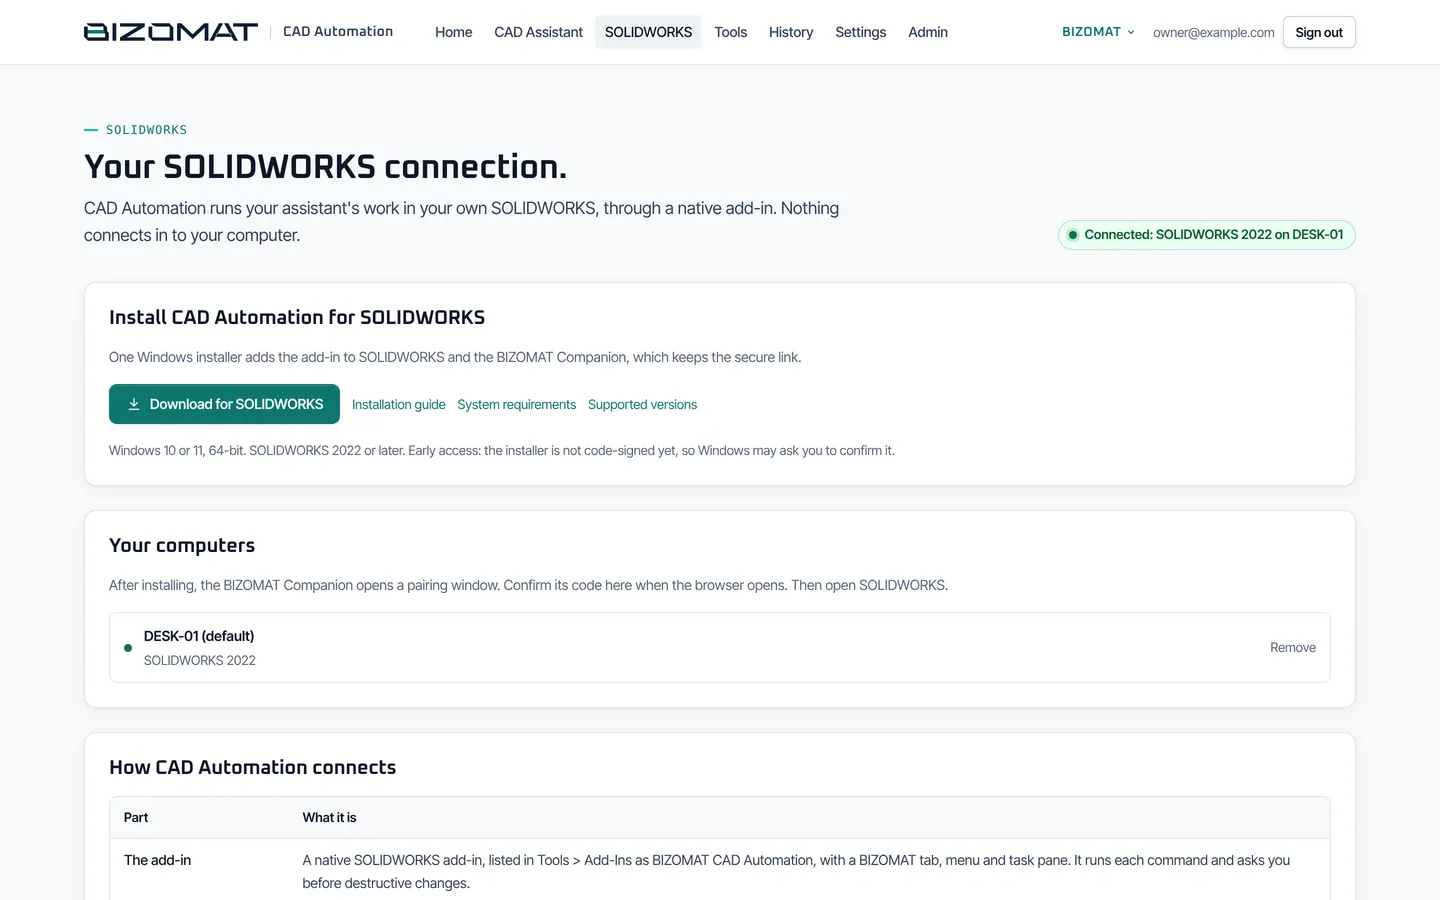
On the SOLIDWORKS page, choose Download for SOLIDWORKS. The download needs your sign-in. The file is BIZOMAT-CAD-Automation-x64.msi, and its SHA-256 checksum is published next to it.
Close SOLIDWORKS
Save your work and close SOLIDWORKS before you install.
Run the installer
Open the file and follow the steps. Windows asks for administrator approval once. The installer adds the add-in and the Companion, registers the add-in with every SOLIDWORKS version on the computer and starts the Companion when you sign in to Windows. It does not change your CAD files.
For IT teams
A silent install that sets the service address for everyone is described in the set-up and troubleshooting guide in CAD Automation.
Step 5 of 13 Live
Pair the computer
Pairing adds the computer to your account, so commands can reach it.
The pairing window
After the install, the Companion opens its pairing window by itself. You can also open it from the Companion's tray icon: Pair this computer.
Check the address and the name
Check the CAD Automation service address and the name for this computer.
Email and password
Enter the email and password you sign in to CAD Automation with, then choose Pair. The computer is added at once.
Or confirm in the browser
Leave email and password empty and choose Pair. Your browser opens CAD Automation: sign in, check it shows the same code as the Companion, and choose Add this computer.
What pairing does
The Companion makes a key for this computer in the Windows key store (in the TPM where there is one). The key cannot be copied to another computer, and no password is stored on the computer.
More computers
Pair each one the same way. The SOLIDWORKS page lists them: make one the default, or remove one.
Step 6 of 13 Live
Open SOLIDWORKS
The add-in loads by itself
Open SOLIDWORKS normally. The add-in loads, connects to the Companion and adds a tab, a menu and a task pane.
The task pane
Shows the connection, prompts to copy into your assistant, the confirmation setting, live activity and links to your Home and help.
No tab?
Open Tools > Add-Ins, tick the add-in under Active and Start Up, and make sure SOLIDWORKS is not running as administrator.
Pause
The Companion's tray menu can pause it: commands are refused until you resume.
Step 7 of 13 Live
Connect your AI assistant
MCP, the Model Context Protocol, lets an AI assistant call tools in other software. CAD Automation gives your assistant its SOLIDWORKS tools through one connector address.
Copy the connector address
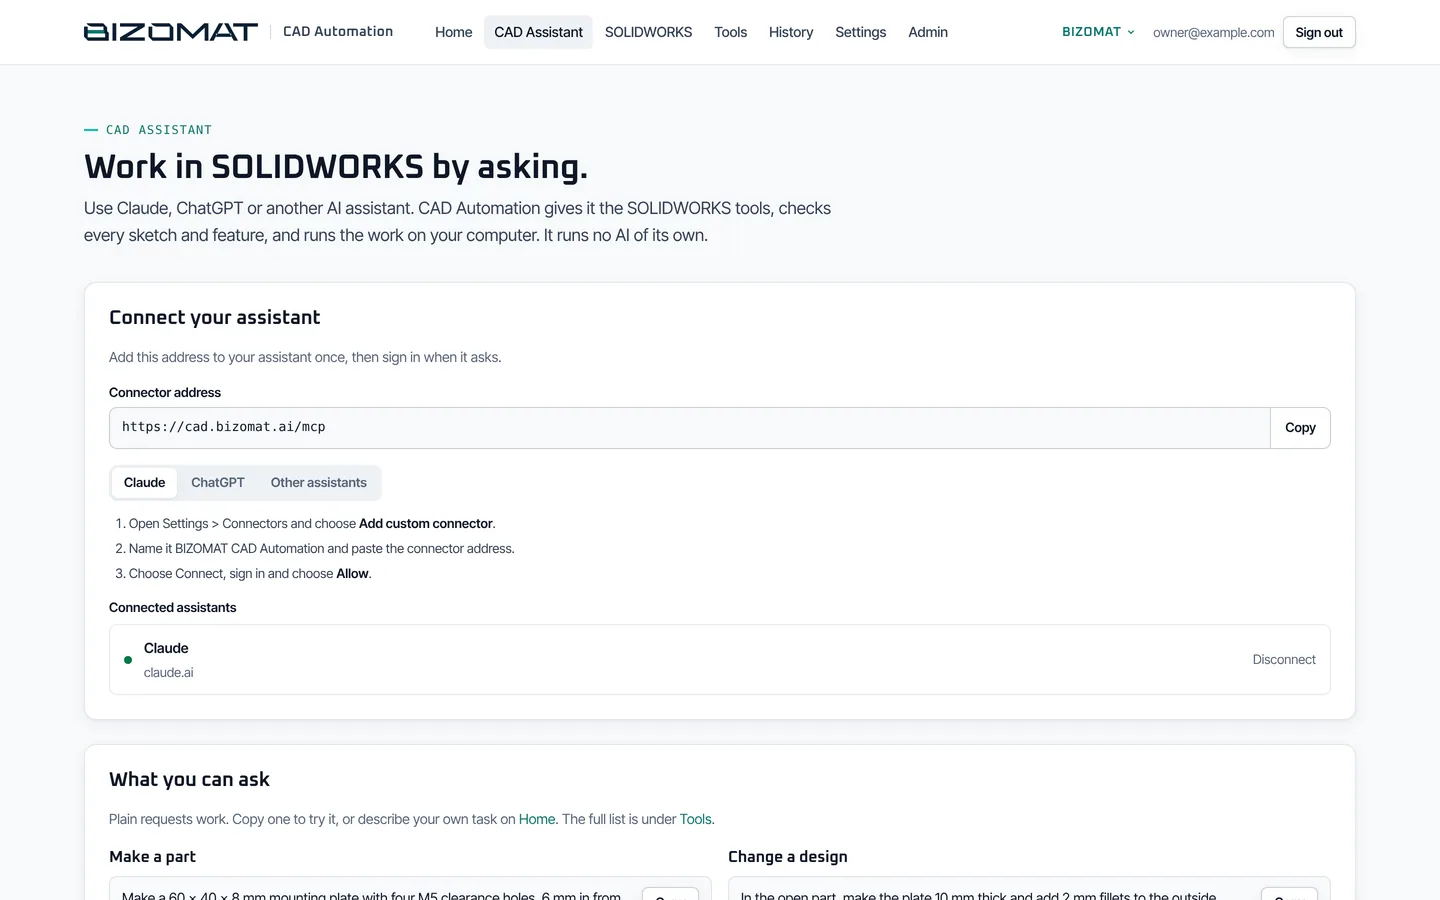
Open CAD Assistant and copy the Connector address. It ends in /mcp. Add it to your assistant once.
Claude
Open Settings > Connectors and choose Add custom connector. Name it, for example BIZOMAT CAD Automation, paste the address, choose Connect, sign in and choose Allow.
ChatGPT
Where your plan allows custom connectors, add a new connector, paste the address, sign in when asked and choose Allow. Your workspace administrator may need to allow custom connectors first.
Other assistants
Any app that supports remote MCP servers over Streamable HTTP can use the address. If it cannot sign in, use the private address in Settings, and treat it like a password.
Connected assistants
CAD Assistant lists each assistant after you choose Allow. Disconnect removes one.
Step 8 of 13 Live
Check that it works
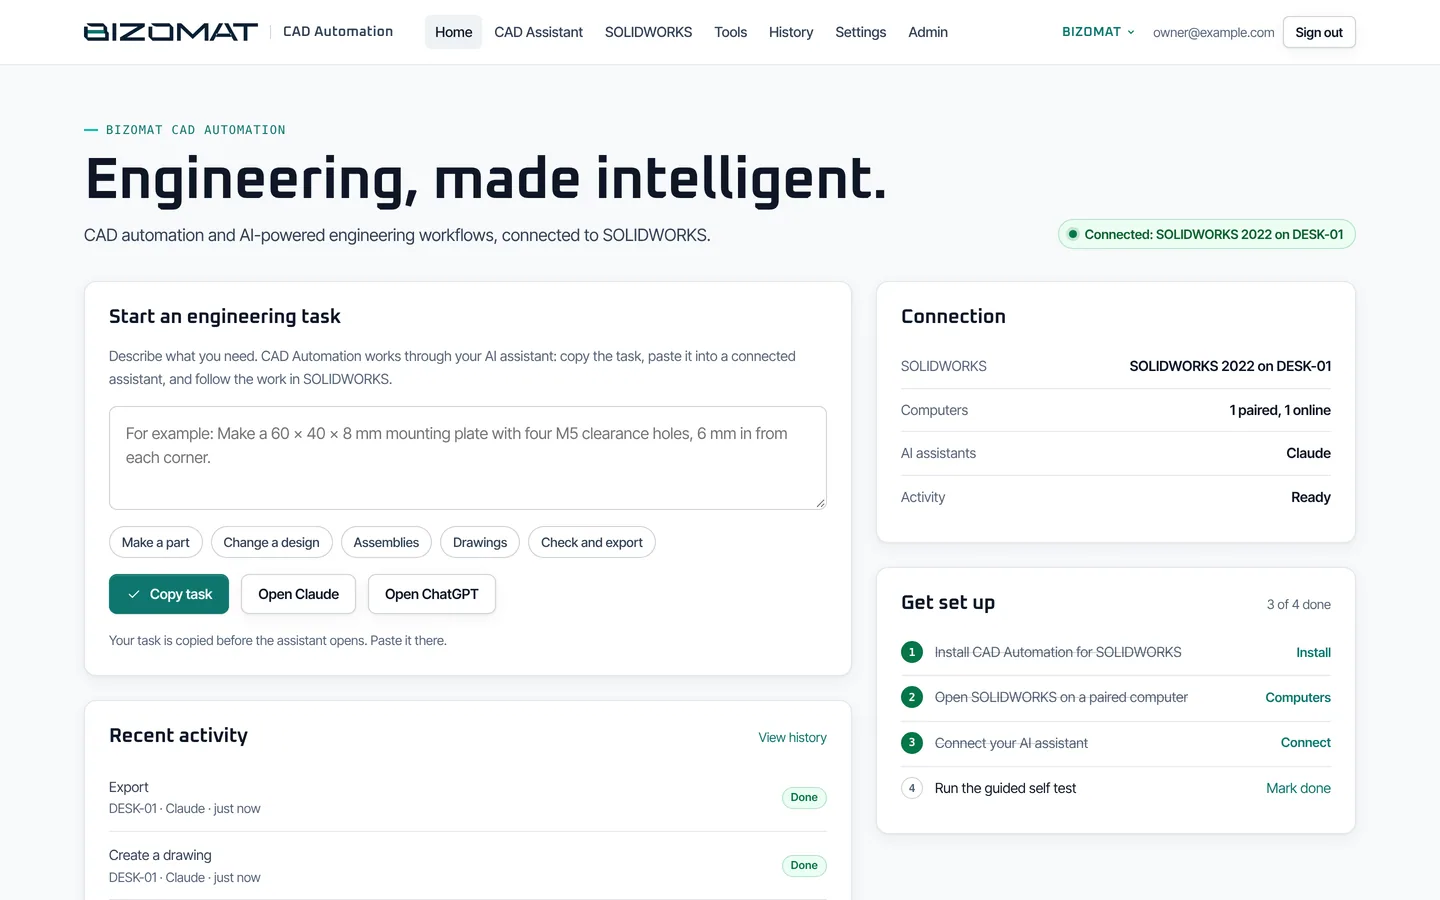
Home
The Connection panel shows SOLIDWORKS, your computers, your AI assistants and current activity: Connected, Disconnected, Checking connection, Authentication required, Installation required or Connection error.
Ask for a check
Ask your assistant: "Check the CAD Automation connection to SOLIDWORKS." It tells you which computer and which SOLIDWORKS version it reached.
Run the self test
Ask: "Run the SOLIDWORKS self test, all three stages." It builds a plate, a set of shapes and an assembly on your computer, makes a drawing and a PDF of the plate, and reports each step as ok, check or failed with the reason.
On every computer
Run the self test once on each computer and SOLIDWORKS version you use. The add-in has not yet been run on many real SOLIDWORKS installations, and the report shows exactly what works on yours.
Step 9 of 13 Live
Make your first part from a request
Describe it
On Home, type the task under Start an engineering task, or pick an example. Choose Copy task, then Open Claude or Open ChatGPT, and paste it there. Or write straight to your connected assistant.
An example
"Make a 60 x 40 x 8 mm mounting plate with four M5 clearance holes, 6 mm in from each corner."
How the assistant builds
It checks the connection, reads the working guide, then builds in small stages. Each sketch is solved and each feature rebuilt on BIZOMAT's kernel before it is sent, and if one step fails the whole stage is taken back.
It checks the result
It compares the expected volume and size with what SOLIDWORKS made, and can measure, inspect and show a preview image.
Follow and save
Watch the features appear in SOLIDWORKS and the activity in the task pane. A new part is saved when it is made; later changes are saved when you or the assistant save.
Step 10 of 13 Live
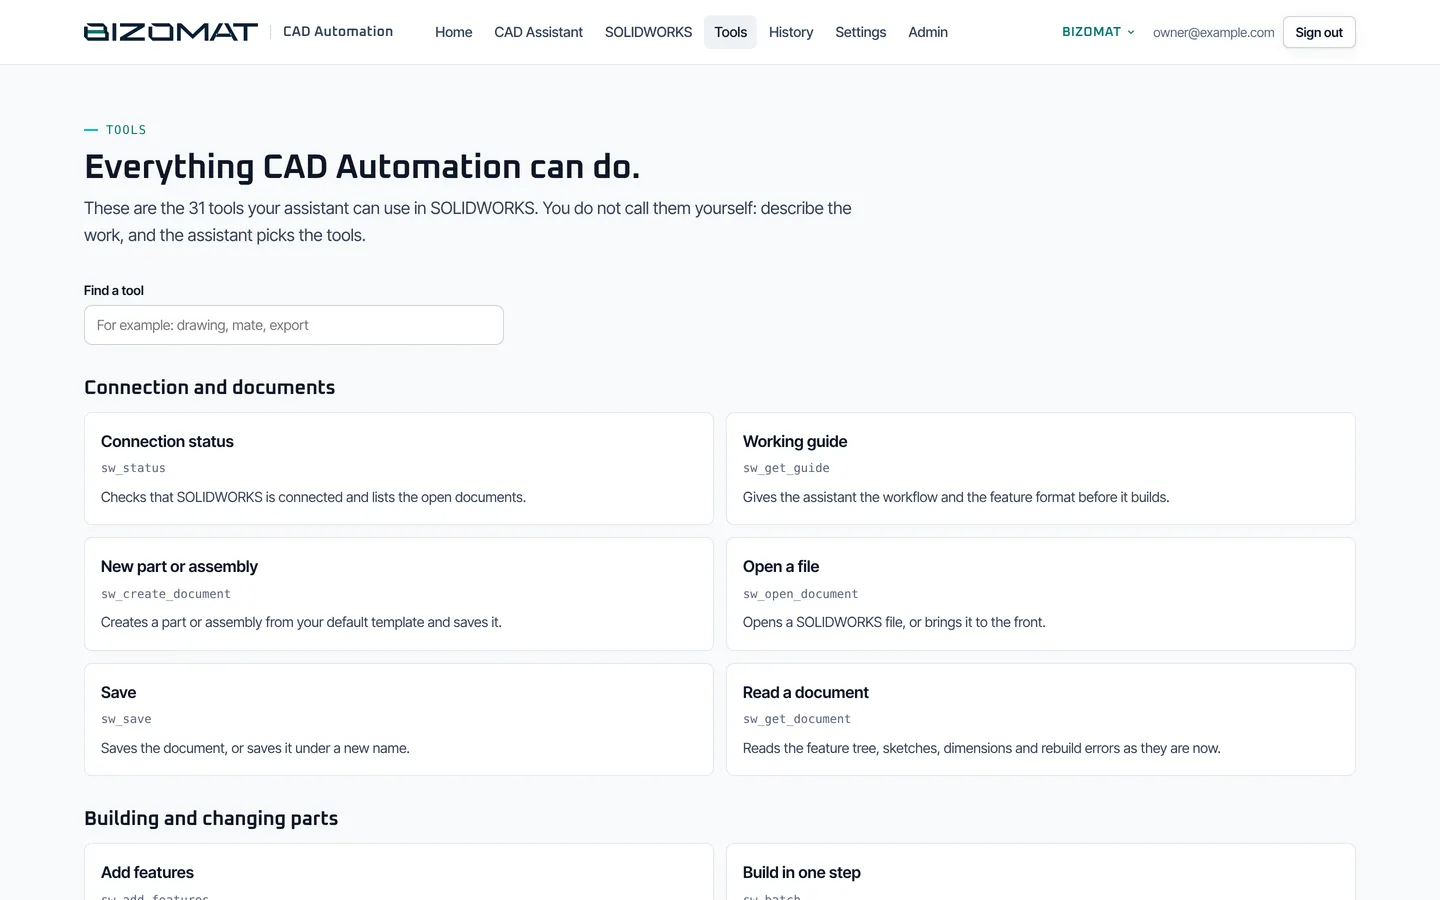
The main workflows
Change an existing design
Ask the assistant to open your part. It reads the feature tree, sketches and dimensions as they are now, then changes dimensions, global variables or equations, or adds features such as fillets.
Assemblies
Make ISO screws, nuts, washers or ball bearings to size, insert components, add mates (with suggestions such as shafts in holes) and run an interference check.
Bring in files
Open STEP, IGES or Parasolid files and save them as SOLIDWORKS files. For a large file the assistant asks for a one-time upload link.
You confirm destructive changes
Deleting features, undoing, saving over a file, replacing a drawing or removing a variable shows a confirm window in SOLIDWORKS naming the AI app. Nothing happens until you choose Allow once; it says no by itself after two minutes.
Several computers
When more than one paired computer is online, the assistant asks which one to use. The one with SOLIDWORKS open is chosen by itself when it is the only one.
Long commands
A long command reports its progress and can be cancelled.
Step 11 of 13 Live
Drawings, exports and reports
Create a drawing
Ask for a drawing of a saved part or assembly. It is a native SOLIDWORKS drawing from your default drawing template, saved next to the model: sheet A4 to A0, third angle (the default) or first angle, the standard views and an isometric, a preferred scale, model dimensions and title block fields.
Refine it
Add section, detail and projected views, notes and a bill of materials, or move and rescale views. The assistant checks the sheet with a screenshot.
Export
Drawings as PDF (every sheet), DWG or DXF; parts and assemblies as STEP, STL, Parasolid or IGES. The download link works for one hour.
Check reports
Ask for an inspection (feature states, volume, area, centre of mass and size), measurements, or an interference report that lists every overlapping pair with its volume.
History
History lists the commands sent to your paired computers, newest first: the tool, the computer, the assistant and how it ended.
The self-test report
Run the self test again after an update or on a new computer, and keep its report: each step ok, check or failed, with the reason.
Step 12 of 13 Live
Invite people and manage access
Accounts on a CAD Automation server are managed by its administrator, on the Admin page. Only the administrator sees it.
Add a person
Admin, Add a person: name, email and a strong password filled in (keep it or type one). Give them the password and the address; they can choose their own in Settings.
Invite links
Make an invite link instead, so the person chooses their own password. A link works once, for 7 days.
Open sign-up
Sign-up: tick Anyone with the address can create an account, or leave it off so only people you add or invite can join.
Suspend, reset or remove
Suspending stops someone's sign-in, AI apps and paired computers at once, until you resume them. Setting a password signs them out everywhere. Removing a person also removes their paired computers.
Your own access
Settings has your private address and add-in key (New makes a fresh one and the old one stops), your password and Sign out. CAD Assistant disconnects an AI app; the SOLIDWORKS page removes a computer.
Step 13 of 13 Connected
Use it with BIZOMAT ERP
BIZOMAT ERP brings CAD Automation's set-up and your company's computers beside the other BIZOMAT systems.
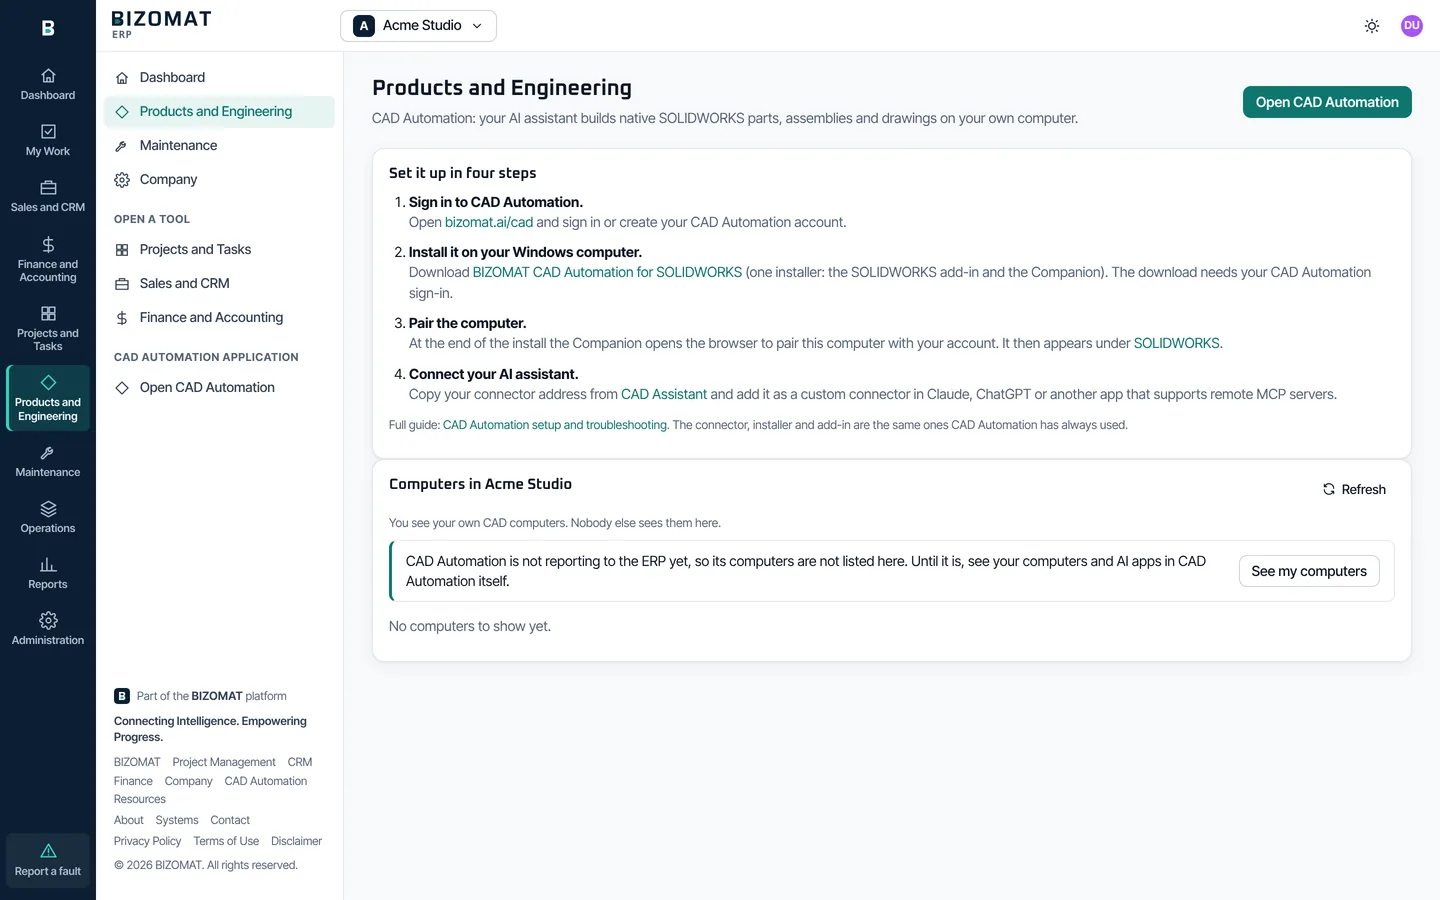
Products and EngineeringConnected
In the ERP's module rail, Products and Engineering, the CAD Automation tab gives the four set-up steps (sign in, install, pair, connect your assistant) with links into CAD Automation, and Open CAD Automation.
Who sees which computersConnected
In a registered company, the owner and administrators see the computers, AI apps and recent jobs of everyone in it; a member sees their own; people who only share one tool see none; another company never sees them.
Until CAD Automation reportsIn development
The computers appear in the ERP once CAD Automation reports to it, which is not switched on yet. Until then the page says that CAD Automation is not reporting to the ERP yet, and See my computers opens them in CAD Automation.
Product and engineering recordsLive
Products with revisions, bills of materials, engineering changes and documents work in BIZOMAT ERP, under Products and Engineering. A document can reference a CAD file on your computer; making a drawing from an ERP product is planned.
Common questions
Before you ask
- Is CAD Automation the same as BIZOMAT Engineering Automation?
- Yes. BIZOMAT Engineering Automation is the system; CAD Automation is its application, at bizomat.ai/cad. It was called CADOS before. Your account, computers and connected assistants carry on unchanged.
- My assistant says SOLIDWORKS is not connected. What do I check?
- That SOLIDWORKS is open on a paired computer and not running as administrator, that the Companion is running (its tray icon) and not paused, and that the add-in is ticked in Tools > Add-Ins. Home shows the state of each part. The set-up and troubleshooting guide in CAD Automation covers the rest.
- I have a new computer. What do I do?
- On the SOLIDWORKS page, remove the old computer if it will not be used again: it stops working at once. Then install and pair the new one. Nothing needs copying from the old computer.
- A computer was lost or stolen.
- Remove it on the SOLIDWORKS page. Its key is refused from that moment, and AI apps can no longer reach it.
- Does CAD Automation use my BIZOMAT ERP account?
- Not yet. It keeps its own sign-in for now; Sign in with BIZOMAT for CAD Automation is in development.
Something not covered here? Read the questions on the BIZOMAT Engineering Automation page, the set-up and troubleshooting guide, or contact BIZOMAT.
SOLIDWORKS® is a registered trade mark of Dassault Systèmes SolidWorks Corporation. BIZOMAT is not affiliated with or endorsed by Dassault Systèmes.