

BIZOMAT ERP · User guide
How to use BIZOMAT ERP
Step by step, from signing in and choosing a company to roles, linked tools and reports. Buttons and fields are named as they appear in the application.
What the labels mean
Each part and some steps carry one of these labels.
- Live Works today in BIZOMAT.
- Connected Works today by linking two BIZOMAT systems, without copying records.
- In development Being built: parts exist, but it is not switched on for everyone yet.
- Planned Designed, not built. Not available today.
Step 1 of 15
Open BIZOMAT ERP
Live
The address
Go to bizomat.ai/erp. Bookmark it: every module opens from there.
From the website
Choose Sign in at the top of any BIZOMAT page, then BIZOMAT ERP.
Old addresses
bizomat.ai/tasks, /crm, /finance and /company forward to the same page inside the ERP, so older bookmarks and links in emails still work.
On a phone
The ERP works in the browser. The module rail moves to a bar along the bottom of the screen.
Step 2 of 15
Sign in or create an account
Live
Sign in
Enter your BIZOMAT email and password and choose Sign in. It is the same account for Sales and CRM, Finance and Accounting, Projects and Tasks and your company.
New to BIZOMAT?
Choose Create an account and enter your full name, work email and a password of at least 10 characters, with letters and a number or symbol.
Confirm your email
If BIZOMAT asks you to confirm your email address, open the link in the email it sends, then sign in.
Engineering Automation
CAD Automation, the application of Engineering Automation, keeps its own sign-in for now, at bizomat.ai/cad.
Step 3 of 15
Choose or register a company
Live
Everything in the ERP belongs to a company. Your own company, in your own name, is ready the first time you sign in.
The company switcher
At the top of the screen. It lists your companies, then "Shared with you": companies where someone added you to a tool, with only those tools.
Your own company
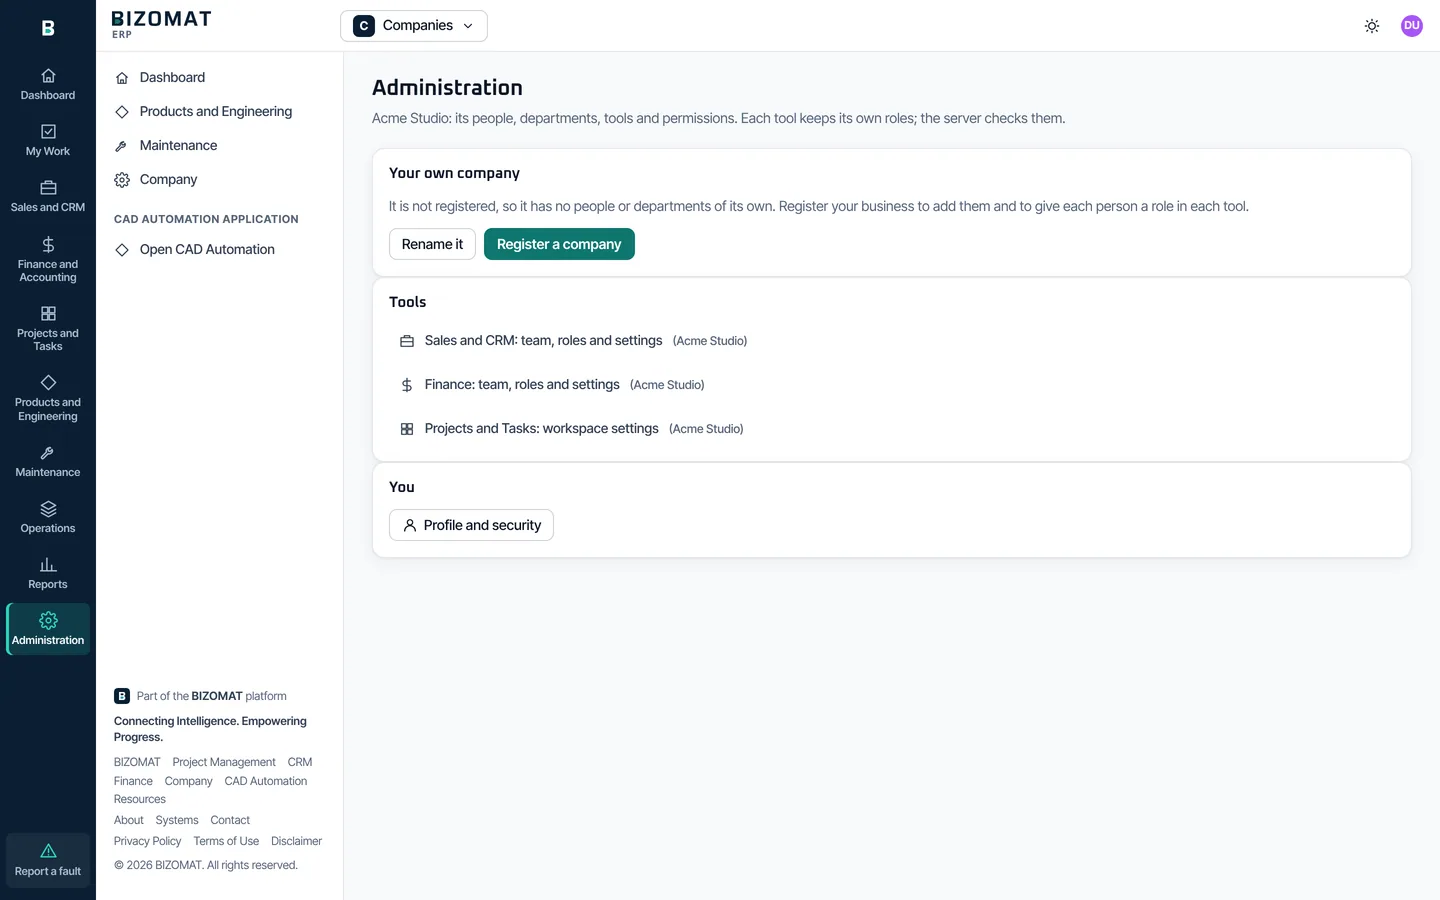
It is not registered and has no ABN. It holds the tools you own outside a registered company. You can rename it.
Register a company
Choose Register a company in the switcher. Pick A business, registered with its ABN, or Myself, in my own name, where an ABN is optional.
The details
Business name, ABN, contact email, phone, street address, suburb, state and postcode, and a website if you have one. Company accounts are for Australian businesses for now.
What is checked
The ABN's check digits. When the Australian Business Register lookup is switched on, the ABN is also looked up there. The contact email gets a confirmation link, unless it is your own confirmed sign-in address. The phone number is checked against the Australian numbering plan but is never called or texted, and the postcode is checked against the state. Company checks shows what was checked.
Its tools
Registering gives the company a Projects and Tasks workspace, a Sales and CRM organisation and a Finance business workspace. You can bring in tools you already own instead.
Step 4 of 15
Explore the example company
Live
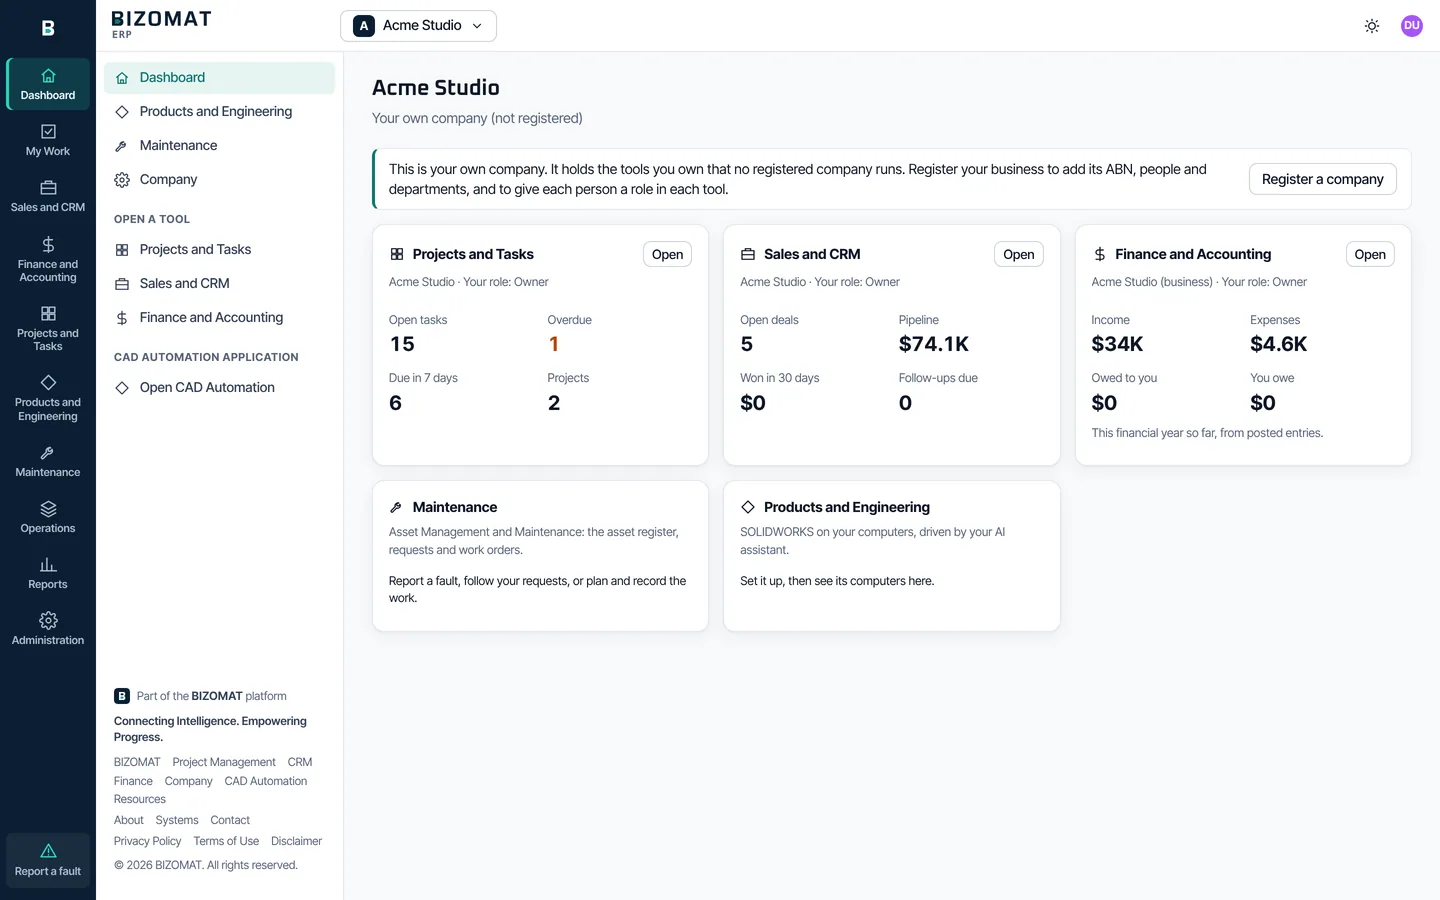
Every account has an example company, Acme Studio, with invented data to learn BIZOMAT before using your own.
Find it
Open the company switcher. Acme Studio (example) is listed last, under Example company. It is made the first time you open the ERP.
What is in it
Two example projects with a dashboard and a brief, customers and deals in Sales and CRM, transactions and a draft quote in Finance, and an asset register with requests and work orders in Maintenance.
Try anything
Change, add or delete what you like. Only you can see it, nobody can be invited to it, it sends no email, and nothing in it affects your own companies.
Remove it
In Administration, choose Remove the example company. You can add a new one there later.
Step 5 of 15
Set up departments and tools
Live
Open Administration in the rail. For a registered company it links to the company area: Company overview, People and roles, Departments, Tools and Company settings.
New department
In Departments, choose New department. Give it a name and a head, and under Part of choose the department it sits in, if any.
In every tool Connected
A department becomes a team in Projects and Tasks, a team in Sales and CRM led by its head, and a department in Finance tracking.
Tools
Tools lists the tools the company runs. The owner can bring in a tool they already own. Personal and household Finance workspaces stay private and are never offered.
Each tool's settings
Administration also links to each tool's team, roles and settings: Sales and CRM, Finance, and the Projects and Tasks workspace.
Company settings
The registered details and how they were checked. The owner can hand the company to an administrator, or close the company account; closing leaves the tools and their records as they are.
Step 6 of 15
Add your first records
Live
Sales and CRM
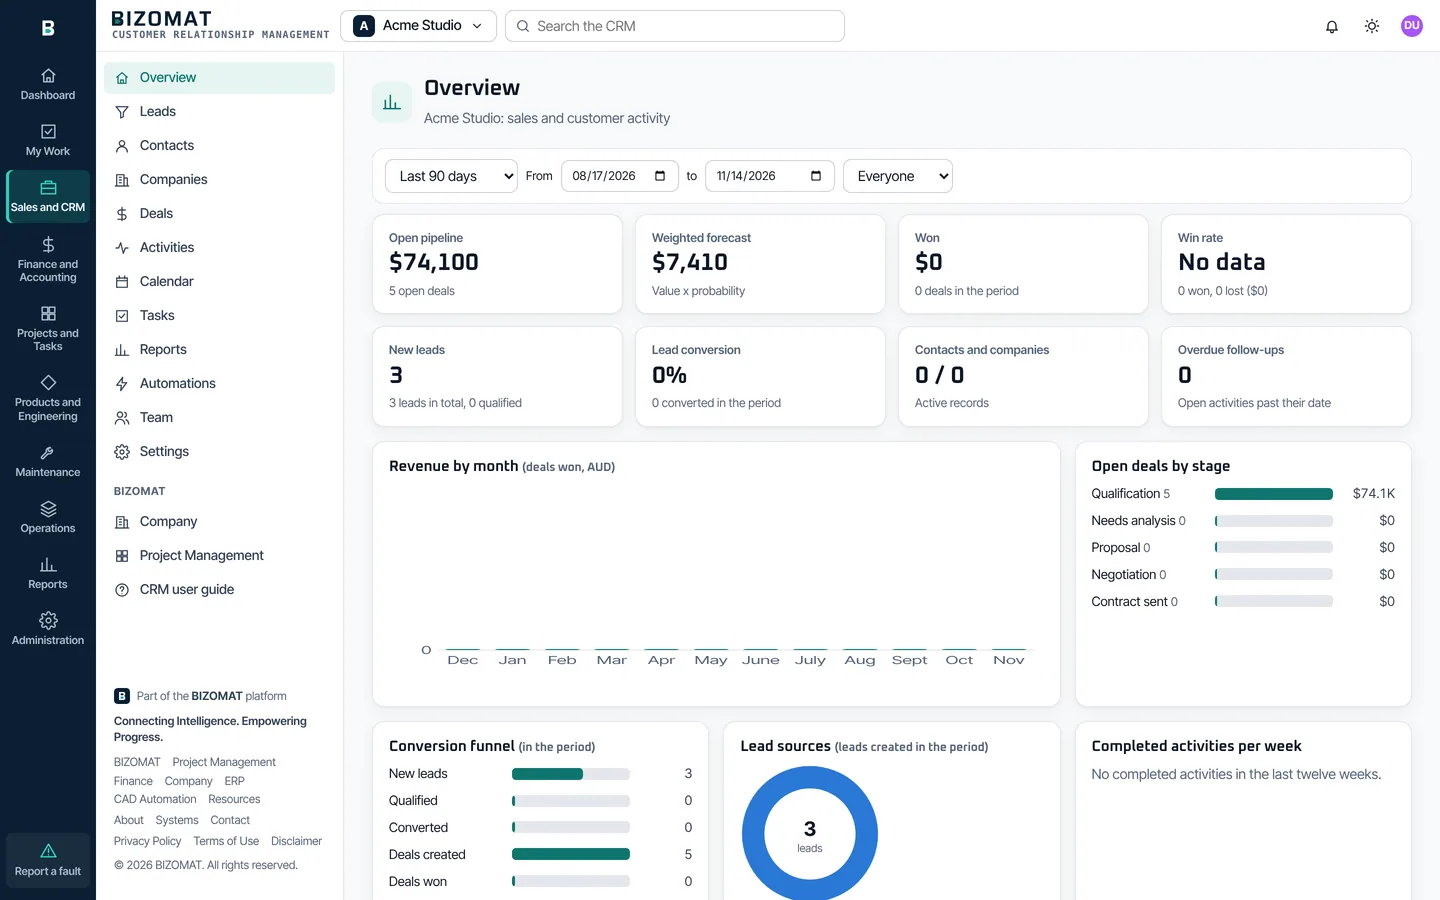
Choose Sales and CRM in the rail. Add a contact, a company or a lead, or import them from a CSV file, then add a deal.
Finance and Accounting
Choose Finance and Accounting. In the company's business workspace, record a transaction, import a bank statement, or create a quote or an invoice.
Projects and Tasks
Choose Projects and Tasks. Create a board, from a template or empty, and add items with an owner, a status and a date.
Back to the dashboard Connected
The dashboard shows each tool's figures the next time you open it.
Step 7 of 15
Invite your people
Live
Invite someone
In Administration, open People and roles. Under Invite someone, enter the person's email and, if you like, their job title.
Company role
Member, or Administrator if you are the owner.
A role in each tool
Choose their role in Projects and Tasks, Sales and CRM and Finance, or No access. Finance starts at No access, so choose a role only for people who should see the money.
Departments
Tick the departments they belong to, then choose Send invitation.
The link
BIZOMAT emails the invitation when its email service is connected, and shows the link either way, so you can send it yourself. It works only for the invited email address, for 14 days.
Accepting
The person opens the link and signs in, or creates an account, with the invited address. Accepting confirms that address.
Already in a tool?
People who joined a tool directly are listed under "In a tool, not in the company". An administrator can add them to the company, keeping their roles.
Step 8 of 15
Roles and permissions
Live
Permissions are set for each person, in each tool. The ERP never gives access to anything: it shows what each tool allows.
Company roles
Owner, administrator or member. The owner and administrators manage people, departments and tools; the owner alone can transfer or close the company.
Tool roles
Projects and Tasks: Administrator, Project manager, Member or Viewer. Sales and CRM: Administrator, Manager, Sales Executive, Member or Viewer. Finance: Administrator, Accountant, Finance Manager, Contributor or Viewer.
Change a role
In People, change a person's role in a tool and it changes in that tool. No access takes them out of it.
Finer control
Sales and CRM and Finance each let owners and administrators adjust what a role may view, create, edit, delete, import and export, in that tool's settings.
Departments
A department's head can change who is in it, and sees that department's figures in every tool. Departments do not carry permissions of their own.
Figures on the dashboard Connected
Each tool's figures show only to people whose role in that tool may see them. Everyone else sees a note instead.
CAD computers In development
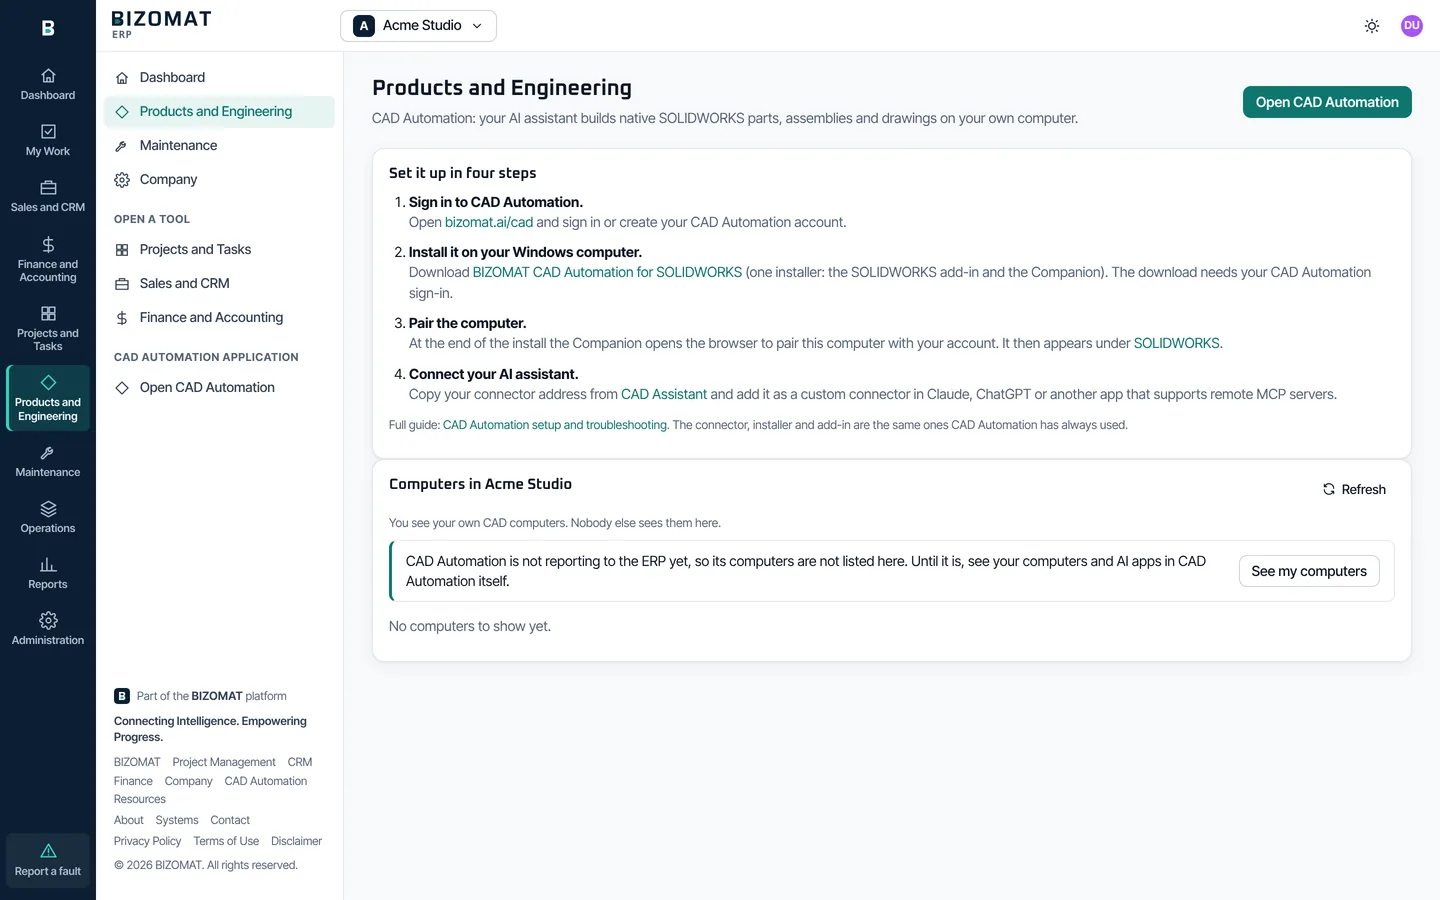
In Products and Engineering, owners and administrators will see the computers of everyone in the company and members their own, once CAD Automation reports to the ERP.
Step 9 of 15
Work across the modules
Connected
These links work when the company runs both tools. Each makes a record in the other tool only when you ask, and checks your role there first.
Lead to deal Live
In Sales and CRM, open a qualified lead and choose Convert: a contact, a company and a deal at once.
Deal to quote Connected
On the deal, choose Start a quote. A draft quote is made in Finance for the deal's company, to price in detail there. Its progress shows on the deal.
Won deal to invoice Connected
When the deal is won, choose Make a draft invoice: one line with the deal's title and value. Check the amount, GST and account in Finance before approving. Once per deal, in the same currency.
Deal to project Connected
On the deal, choose Start a project: a board named after the deal in the company's Projects and Tasks. Once per deal.
Activity to task Connected
An activity's menu has Create a project task, which puts it in a project with a link back to the customer.
My Work Live
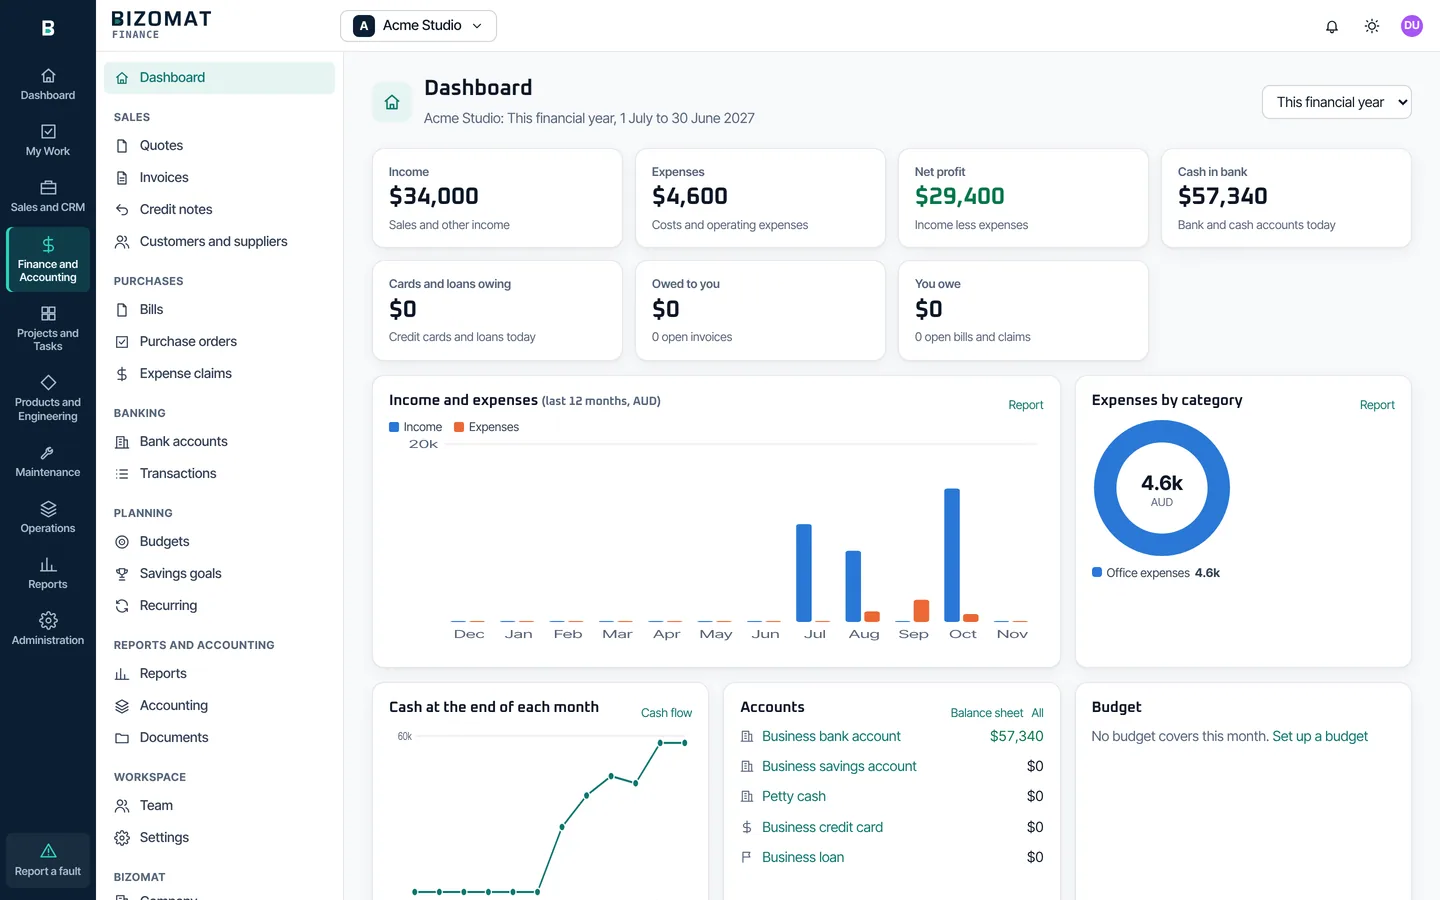
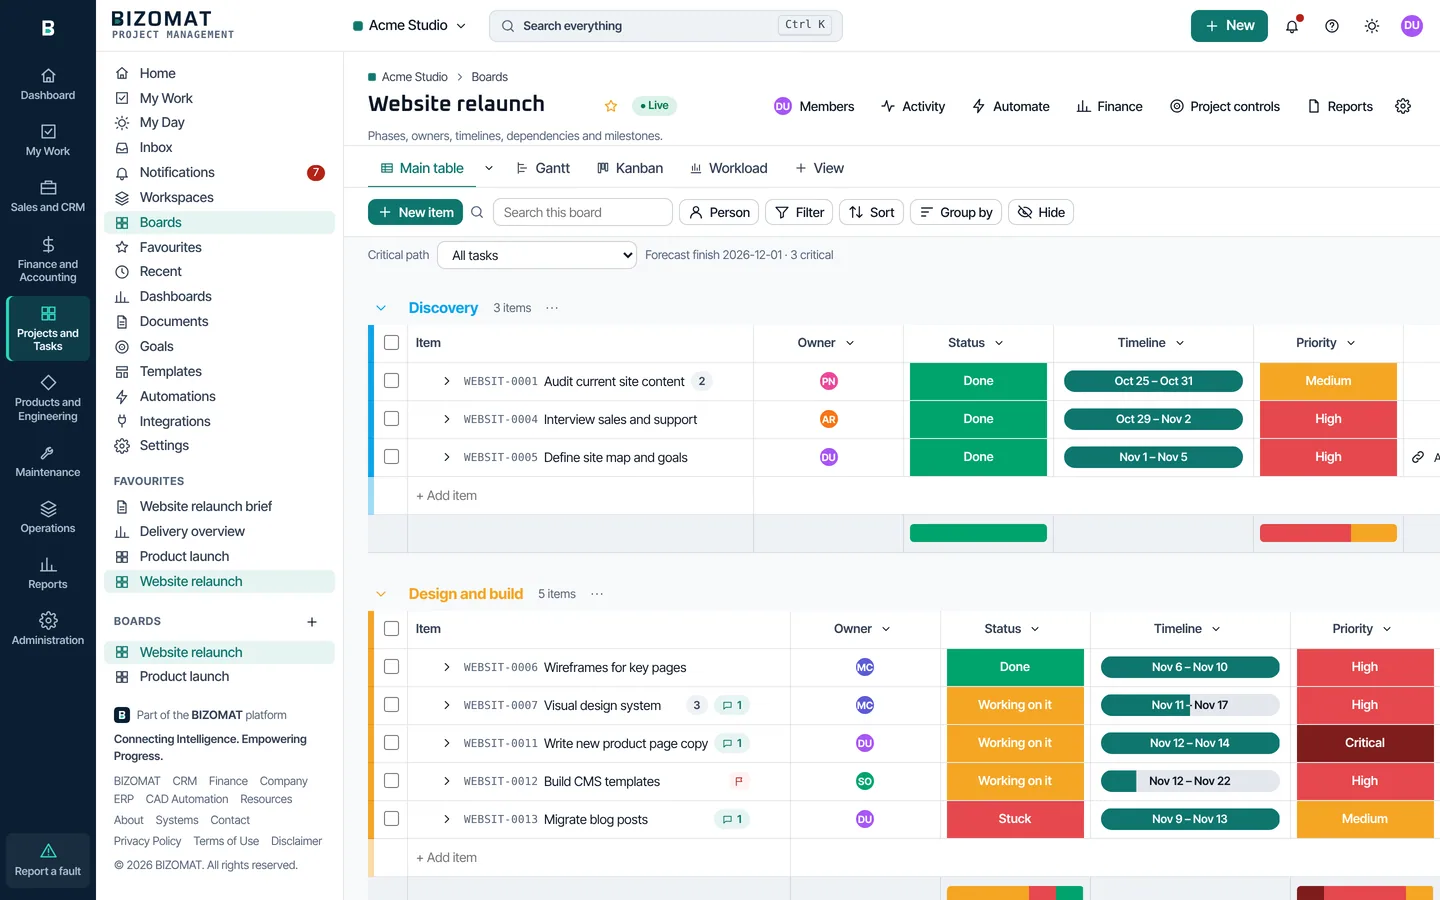
Choose My Work in the rail to see everything assigned to you in Projects and Tasks.
Step 10 of 15
Read the dashboard and reports
Live
The dashboard Connected
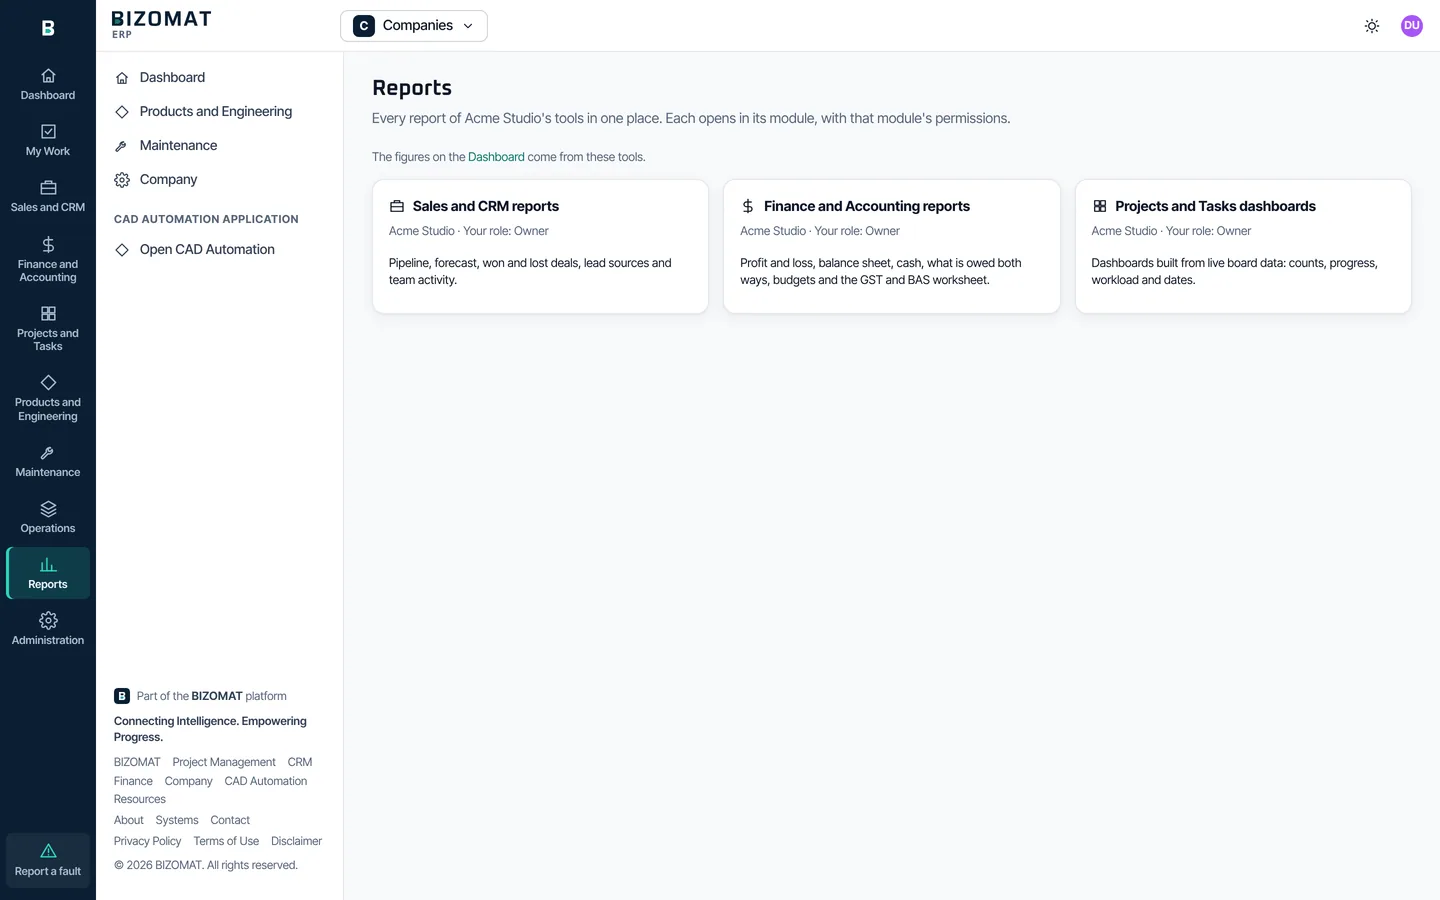
A card for each tool: open tasks, overdue, due in 7 days and projects; open deals, pipeline, won in 30 days and follow-ups due; income, expenses, owed to you and you owe, this financial year.
Reports
Choose Reports in the rail. It has a card for each tool: Sales and CRM reports, Finance and Accounting reports and Projects and Tasks dashboards.
Open a report
Each card opens the report in its own module, with that module's permissions. CRM reports export to CSV; Finance reports to CSV and PDF.
By department Connected
Administration, Company overview shows totals for the company and for each department, from every tool.
Step 11 of 15
Link the tools
Connected
One customer record Connected
On a CRM company, under In Finance, link it to the Finance contact it is billed as, or create that contact. Its open invoices and what it owes show in the CRM to people whose Finance role sees sales.
Project costs and budget Connected
In the company area, open Projects and give a project a Finance tracking project and a budget. Income and costs posted to it show against the budget. Tracking needs a Finance role that manages accounting.
Engineering Automation Live
The CAD Automation tab of Products and Engineering gives the four set-up steps: sign in to CAD Automation, install it, pair the computer and connect your AI assistant.
A supplier and Finance Connected
On a supplier in Procurement, under Finance, link it to the supplier it is paid as in the company's Finance, or create that supplier there. Linking checks your role in Finance; nothing is copied.
CAD computers and sign-in In development
Listing the company's computers in the ERP, and signing in to CAD Automation with your BIZOMAT account, are being built. Until then the page says so and links to CAD Automation.
Step 12 of 15
Look after assets in Maintenance
Live
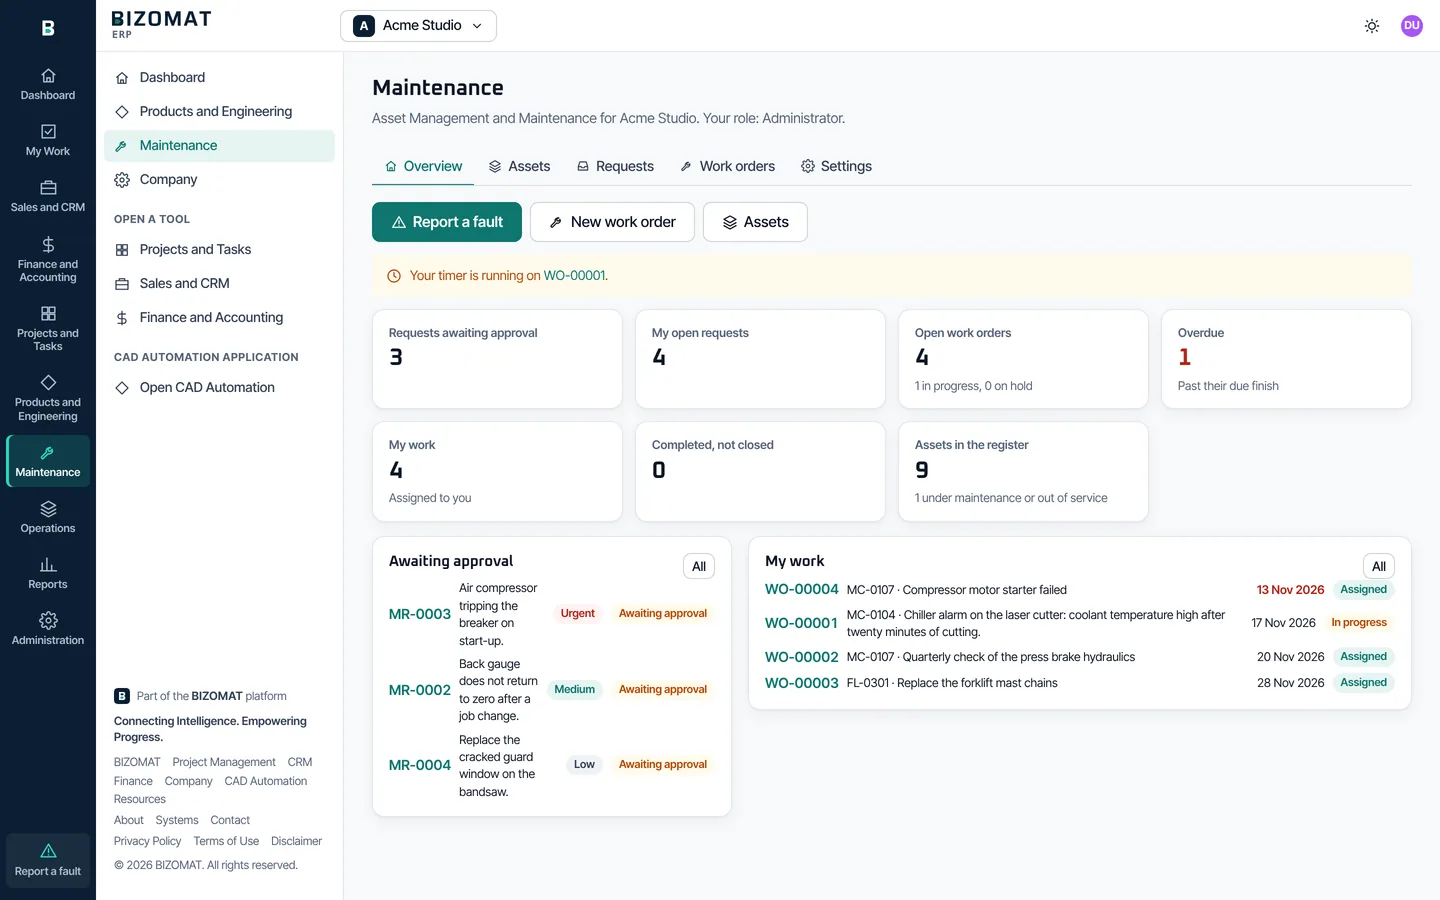
Maintenance in the rail opens the company's asset register, maintenance requests and work orders. Everyone in a registered company can raise a request; the company's owner and administrators give the other maintenance roles.
Maintenance roles
In Maintenance, Settings, give each person a role: Administrator, Supervisor, Technician or Requester. The company's owner and administrators start as maintenance administrators, everyone else as requesters. Settings also says whether new requests need approval.
Register assets
In Assets, choose New asset. Give it a number and a name, and put it under another asset to build the hierarchy: a site, an area, a line, a machine, a part. Add its make, model, serial number, location, criticality and specifications.
Import a register
Administrators can choose Import CSV. A preview shows each row as ready, a duplicate or an error before anything is saved.
Report a fault
Choose Report a fault at the foot of the rail, on any screen of the ERP. Say what is wrong, pick the asset if you know it, set the priority and add a photo. You can follow the request under My requests.
Approve the request
A supervisor opens the request in Requests, Awaiting approval, and chooses Approve, Decline (with a reason) or Ask for more information.
Make a work order
On the request, choose Make a work order, or attach the request to a work order already open on the same asset. Give the job type, priority, technician, due dates, instructions, safety requirements, tasks and required parts. A request makes one work order, never two.
Do the work
The technician opens the work order, chooses Start timer, ticks the tasks, adds the parts used, notes and photos, then Stop timer. Time recorded is shown against the estimate.
Complete and close
Choose Complete and say what was done and what was found. A completed work order is locked; a supervisor closes it, or reopens it with a reason that is kept in the history.
Find the history
An asset's page shows the assets under it, its outstanding work, open requests, files and every change, with who made it and when. Work order lists can include the assets under the one you choose.
Step 13 of 15
Products, bills of materials and engineering changes
Live
Products and Engineering in the rail opens the company's products, changes, documents and CAD Automation. What each person may do comes from their ERP roles, set in Administration, ERP roles.
ERP roles
In Administration, choose ERP roles and give each person one or more: Engineer, Engineering approver, Buyer, Procurement manager, Executive or Viewer. The company's owner and administrators are ERP administrators; everyone else is a viewer until given a role.
Add a product
In Products, choose New product. Give its name and type; the number is given for you (PRD-00001) unless you type one. Add its category, unit, costs, price, physical details, lifecycle and effective dates. It starts with revision A as a draft.
Add a variant
On a product, choose New variant and say what sets it apart: size, model, configuration, material, finish or options. The variant is a product of its own.
Build the bill of materials
Open the product's Bill of materials and choose Add a line: the component, quantity per one, unit, scrap allowance, reference designators, alternatives and effective dates. A component that would contain the product itself is refused.
See every level
Structure expands each component's released bill of materials. All levels lists every level with extended quantities and exports CSV. Cost roll-up gives the material cost of one and lists any missing costs or other currencies.
Request a change
Choose Request a change on a product, or New change request in Changes. An engineering approver takes it under review and approves or rejects it.
Change order
A change order carries a new revision of each product it changes, with the lines of the released revision to edit. Submit it when the revisions are ready: they lock.
Approve and release
An engineering approver who did not draft the change order approves and releases it. Release makes its revisions released and the earlier ones superseded, in one step. Released revisions cannot change.
Compare and trace
Revisions compares any two revisions line by line. Where used lists every product that uses a component.
Engineering documents
In Documents, add a drawing, model, PDF or specification to a product and revision: upload a file, or reference a CAD file on your own computer by its path and configuration. Each new version is kept; an engineering approver approves it.
Step 14 of 15
Suppliers in Procurement
Live
Operations, Procurement opens the supplier master. Purchase requisitions, requests for quotation, purchase orders and receiving in the ERP come with Release 2; purchase orders and bills are in Finance today.
Add a supplier
Choose New supplier. Give the legal name, ABN, contact details, addresses, payment terms, currency and usual lead time. The ABN is checked for its form only; it is not looked up on the register.
Approve it
A procurement manager who did not add the supplier chooses Approve. Put on hold and Block need a reason. A blocked supplier cannot be added to a product.
Contacts and documents
Add the supplier's contacts (one is primary) and documents such as certificates.
Who supplies a product
On a product, Suppliers, choose Add a supplier: their part number, price, lead time, minimum order and whether they are preferred.
Performance Planned
Supplier performance is measured from purchase orders and receipts, so it comes with Release 2. The supplier page says so and shows no figures.
Step 15 of 15
What is not built yet
Planned
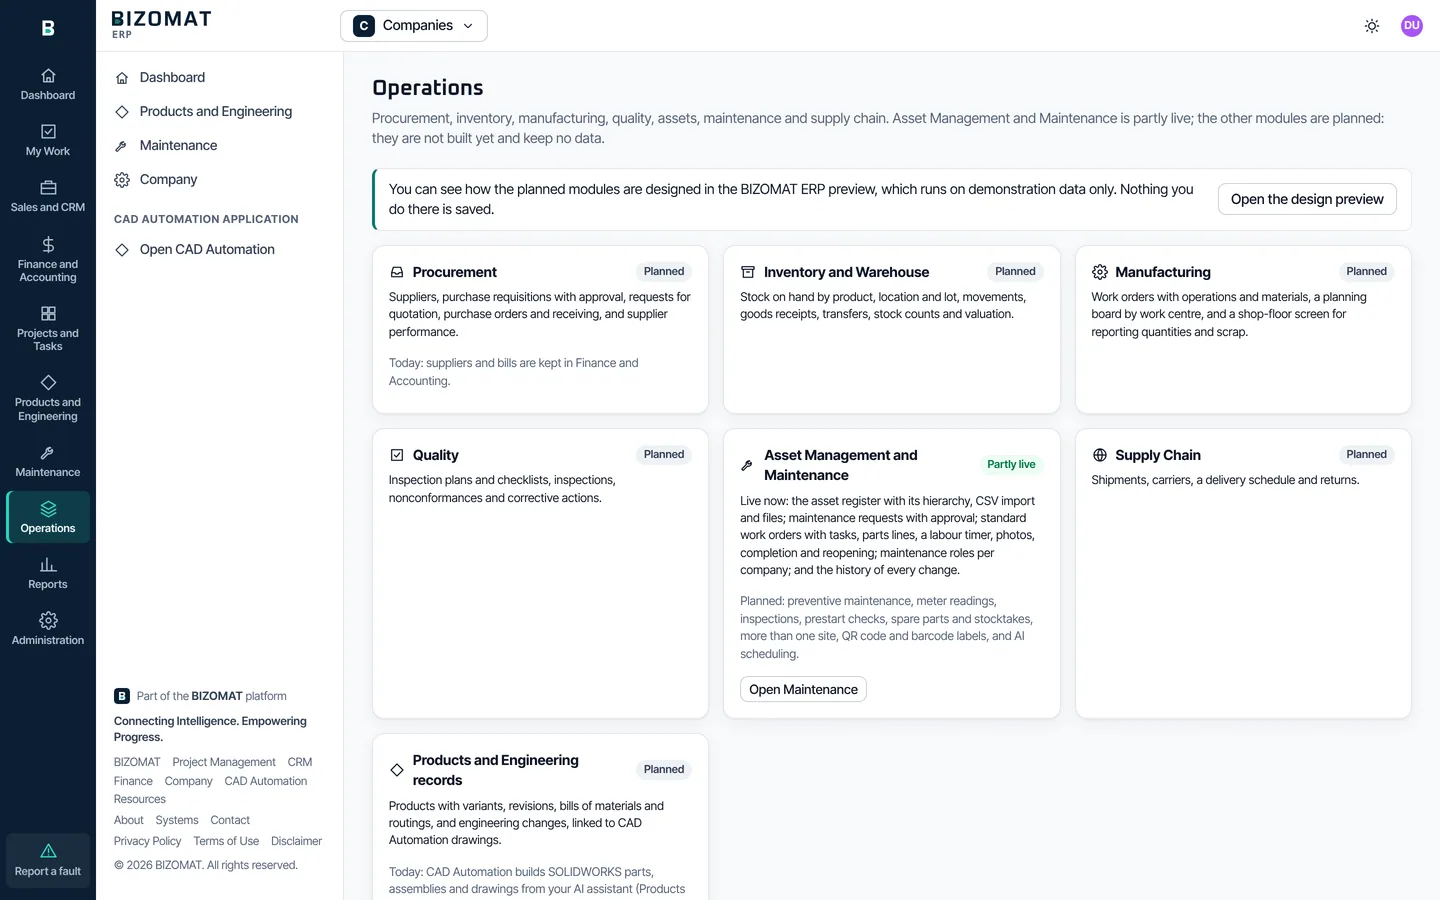
Operations in the rail lists the modules that are designed but not built. Nothing there works yet or keeps data. The first stage of Maintenance, the supplier master and the product and engineering records work today.
Planned modules Planned
Purchase requisitions, quotations, purchase orders and receiving in the ERP, Inventory and Warehouse, Manufacturing (with routings), Quality and Supply Chain. Each is labelled Planned.
Later in Maintenance Planned
Preventive maintenance, readings, inspections, prestart checklists, spare parts, scanning, several sites, workload planning, an AI scheduling assistant that only proposes schedules for a person to approve, reliability reporting and offline field work.
What to use today Live
Purchase orders and bills are kept in Finance. Production work can be planned on a board in Projects and Tasks.
Common questions
Before you ask
- What is the example company?
- Acme Studio (example) is invented data that every account gets, to learn BIZOMAT safely. Only you can see it, it sends no email, and you can remove it in Administration.
- Do I need to register a company to use the ERP?
- No. Everyone has their own company in their own name. Register a company when you want to add people, departments and roles.
- Can I belong to more than one company?
- Yes. Register more than one, or accept invitations, and switch between them with the company switcher.
- Why can I not see a tool's figures on the dashboard?
- Your role in that tool does not show them. Ask the company's owner or an administrator to change your role in People.
- Why are no computers listed under Products and Engineering?
- CAD Automation does not report its computers to the ERP yet. Until it does, see your computers in CAD Automation itself.
- Can I approve my own change order?
- Not in a company of several people: someone else with the Engineering approver role must approve and release it. In your own company, where you are the only person, you may, and the exception is recorded on the change order.
- Does the ERP keep my SOLIDWORKS files?
- No. An engineering document can reference a CAD file by its path on your own computer; the file stays there. Uploaded PDF, DXF and STEP files are kept as attachments.
- Who can raise a maintenance request?
- Everyone in a registered company: choose Report a fault at the foot of the rail. In your own company, you are its only person. People who were only shared a tool with the company cannot see its maintenance.
- Can a technician see every work order?
- No. A technician sees the work orders assigned to them. Supervisors and administrators see them all; a requester sees the work order made from their own request.
- Can I use Procurement, Inventory or Manufacturing?
- Procurement's supplier master works today. Purchase orders and receiving in the ERP, Inventory and Manufacturing are planned and not built. Maintenance works today for assets, requests and work orders; preventive maintenance is planned.
Something not covered here? Contact BIZOMAT.