

BIZOMAT Projects · Project Management System · User guide
How to use BIZOMAT Projects
Step by step, from opening BIZOMAT Projects in BIZOMAT ERP to your first board, your team, dashboards, reports and the links to BIZOMAT CRM and BIZOMAT Finance. Every button and field is named as it appears in the application.
Opens inside BIZOMAT ERP, in the Projects and Tasks module. Sign-in required, with your BIZOMAT account.
- Live Works today in BIZOMAT.
- Connected Works today by linking two BIZOMAT systems, without copying records.
- In development Being built: parts exist, but it is not switched on for everyone yet.
- Planned Designed, not built. Not available today.
Step 1 of 13 Live
Open BIZOMAT Projects in BIZOMAT ERP
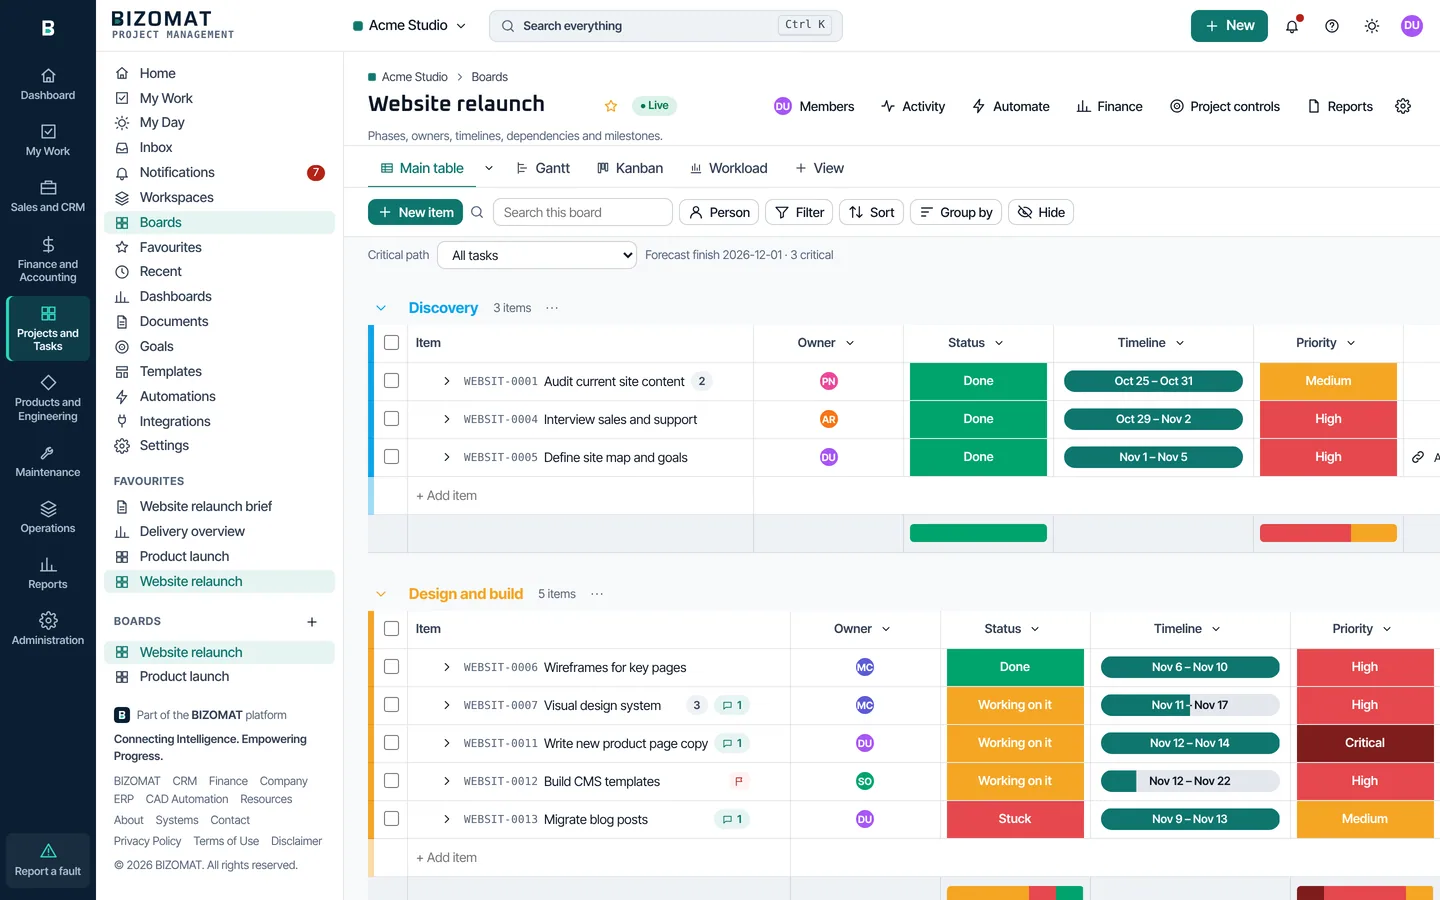
BIZOMAT Projects opens inside BIZOMAT ERP, BIZOMAT's one workspace for signed-in people, as its Projects and Tasks module.
Go to BIZOMAT ERP
Go to bizomat.ai/erp/login, or choose Sign in at the top of any BIZOMAT page.
Choose Projects and Tasks
After you sign in, the ERP opens on its Dashboard. Choose Projects and Tasks in the module rail at the left of the screen (a bar along the bottom on a phone).
My Work in the rail
My Work opens everything assigned to you, in the workspace you used last.
Move between modules
The rail stays beside every screen: Dashboard, My Work, Sales and CRM, Finance and Accounting, Projects and Tasks, Products and Engineering, Maintenance, Operations, Reports and Administration. Operations lists modules that are planned and not built yet.
Old addresses
Bookmarks and links to bizomat.ai/tasks still work: they open the same page inside the ERP.
Step 2 of 13 Live
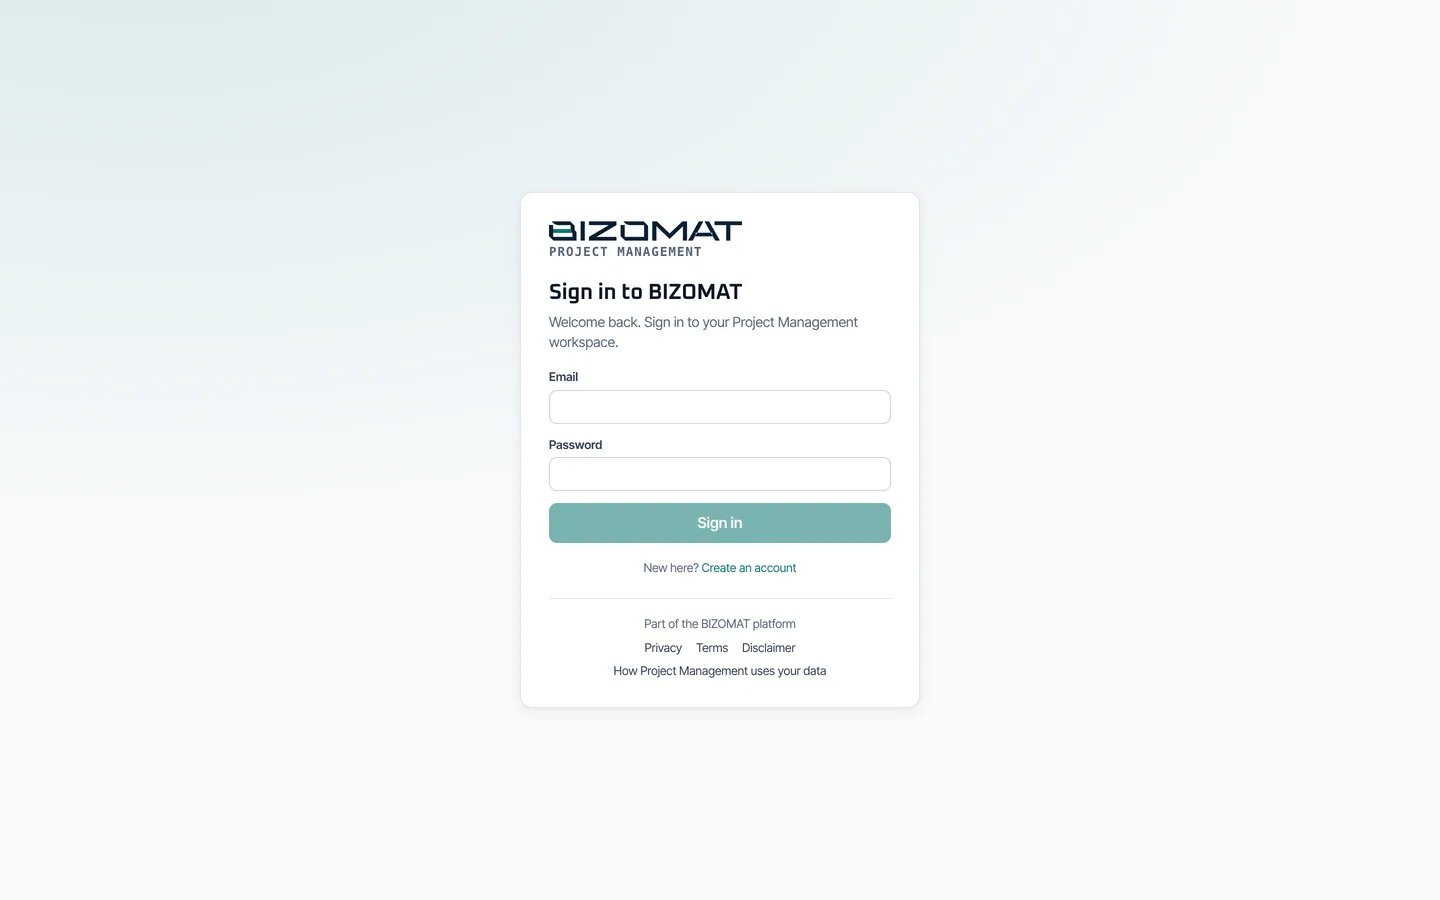
Sign in or create an account
Sign in
Enter your BIZOMAT email and password. It is the same account for BIZOMAT CRM and BIZOMAT Finance, and signing in once opens every module of the ERP.
Google
Continue with Google appears on the sign-in page where it is configured.
New to BIZOMAT?
Where the sign-in page offers it, choose Create an account and enter your full name, work email and a password. If BIZOMAT asks you to confirm your email address, open the link in the email it sends, then sign in.
Invited by someone?
Open the invitation link from the email or message, and sign in or create an account to join the workspace.
Used Project Management before?
Sign in with the email and password you already use. Your workspaces, boards and documents are where they were.
Step 3 of 13 Live
Create your workspace
A workspace keeps its members, boards and data completely separate from every other workspace. You can belong to several.
Your first workspace
If you are not in a workspace yet, the Welcome page asks you to create one. Enter the Workspace name and choose Create workspace. You become its owner.
A company's workspace
When a company is registered in BIZOMAT, it gets a Projects workspace. Its owner or an administrator gives you a Projects role, and the workspace appears for you.
More workspaces
Workspaces, in the sidebar, lists yours. New workspace makes another; you can also rename a workspace or leave it there.
Home
Each workspace opens on Home: what is overdue, due today and due in the next 7 days, what needs your attention, recent activity and My Day.
Step 4 of 13 Live
Configure the workspace
Everything here is in Settings. Owners and administrators change the workspace settings; everyone sets their own profile and notifications.
Workspace
Settings, Workspace: its name, description, logo and colour, whether members may invite people (Allow members to invite), and the Default role for new members.
Teams
Settings, Teams: group people, for example by department or discipline.
Finance
Administrators: Settings, Finance sets the Default currency and Who sees financial data by default on boards with money columns.
Templates
On any board, Save as template (in the board's settings) keeps its groups, columns, views and automations for new boards. Templates lists them with the built-in ones.
Your own settings
Settings, Profile, Notifications and Security: your name and photo, which notifications you get in the app and by email, your password, active sessions and personal API tokens.
Step 5 of 13 Live
Create your first board and items
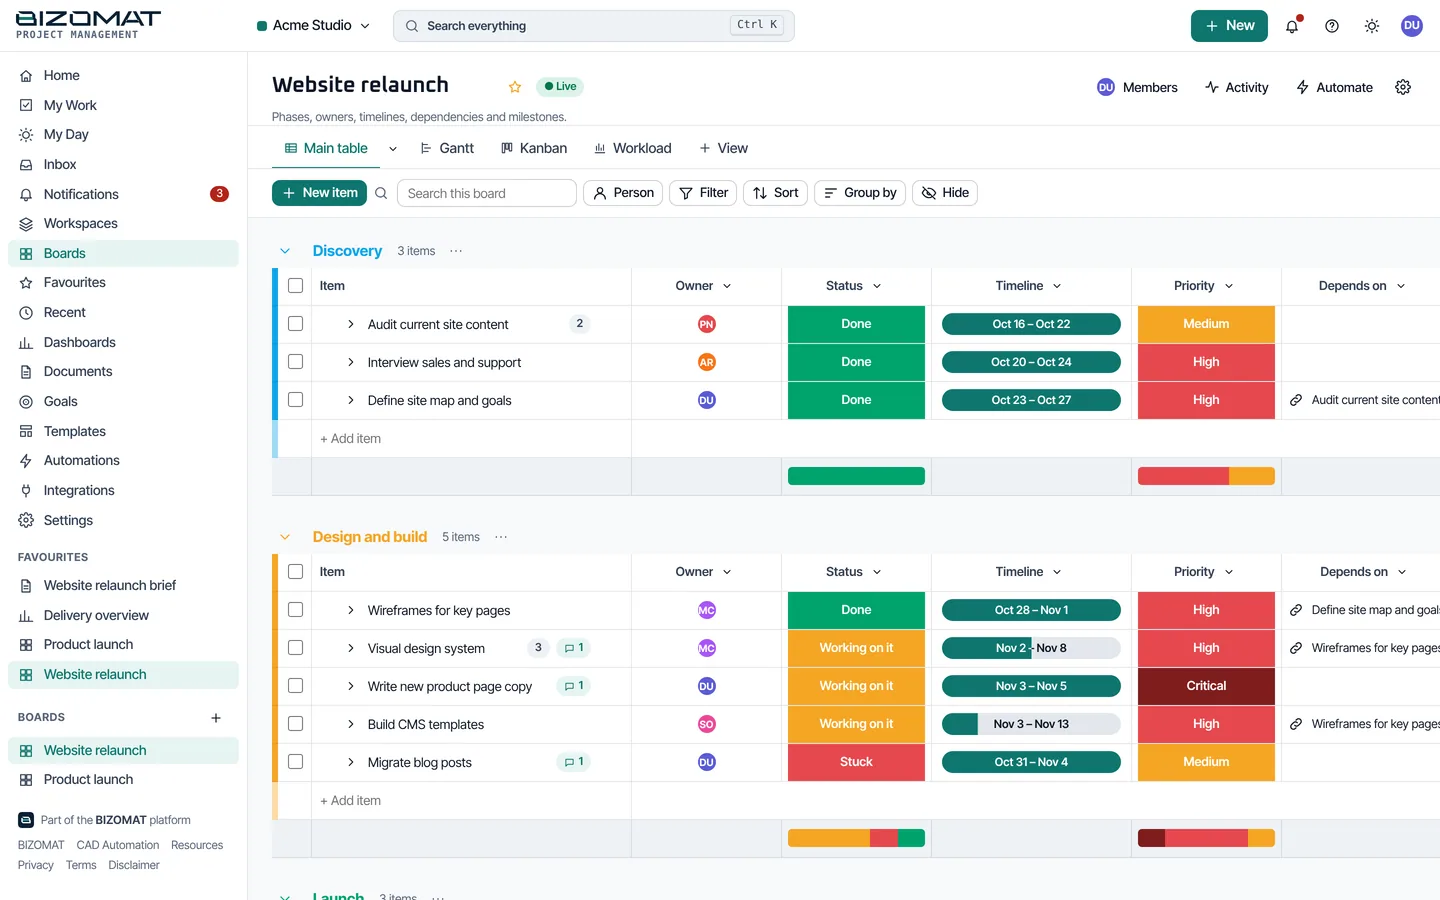
In BIZOMAT Projects a project is a board: groups of items (tasks) with columns for owner, status, dates and anything else you track.
New board
Choose New board on Home or Boards. Enter the Board name and pick a Template: Blank board, Project plan, Sprint board, Sales pipeline, Content calendar and Request intake. A template can include sample items.
Who can see it
Choose Everyone in the workspace, or Only board members for a private board. Then choose Create board.
Add items
Type into + Add item at the bottom of a group, or choose New item. A blank board starts with the groups To do, In progress and Completed.
Fill in the columns
Click a cell to set the owner, status, priority or dates. Add a column with Add column at the end of the headings, from 25 column types such as Person, Timeline, Dependency, Currency and Formula.
Break it down
Use + Add subitem under an item for the steps inside a task.
Step 6 of 13 Live
Plan the work in views
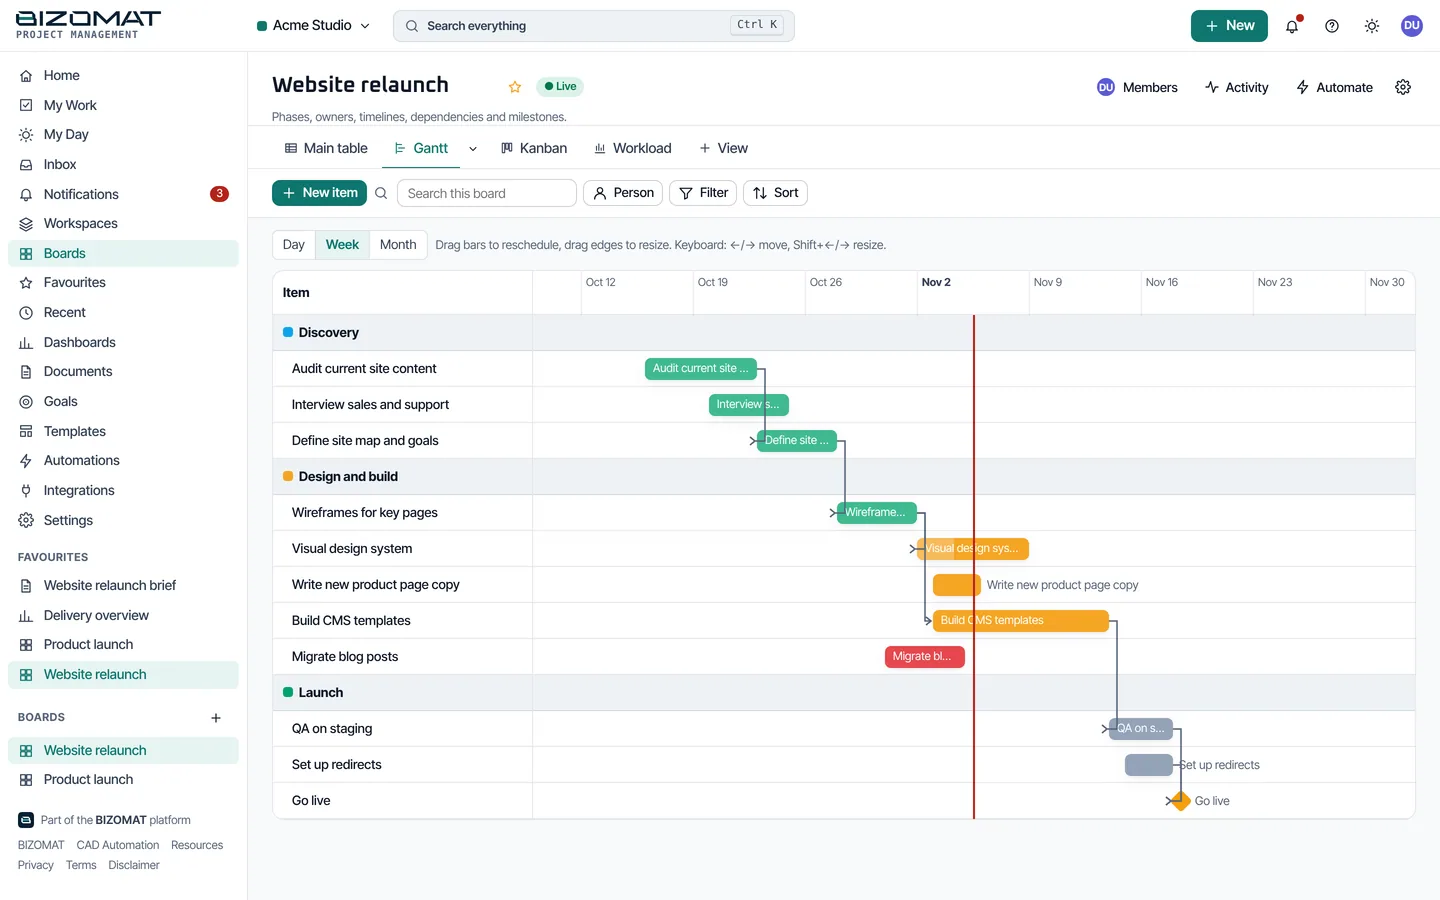
Add a view
Choose + View beside the view tabs and pick one. A view can be shared with the board or kept personal.
Kanban
Cards by status. Drag a card to change its status.
Timeline and Gantt
Bars from each item's dates, with dependencies and milestones. Drag a bar to reschedule it.
Calendar and Workload
Calendar shows items by month, week or day. Workload shows who has how much, and when.
Chart, Form, Map and Files
Counts and sums from the board, a form that adds items, items with locations, and every attachment on the board.
Filter and sort
Filter with AND/OR conditions, sort and group. The view keeps them.
Step 7 of 13 Live
Work together on items and documents
Open an item
Click an item's name. It opens beside the board with Updates, Details, Schedule, Subitems, Files, Activity, Time, Docs and Access.
Updates
Write an update and mention a colleague with @ to notify them. Replies keep the conversation with the task.
Files and time
Attach files under Files. Start and stop a timer under Time to record the time spent.
Documents
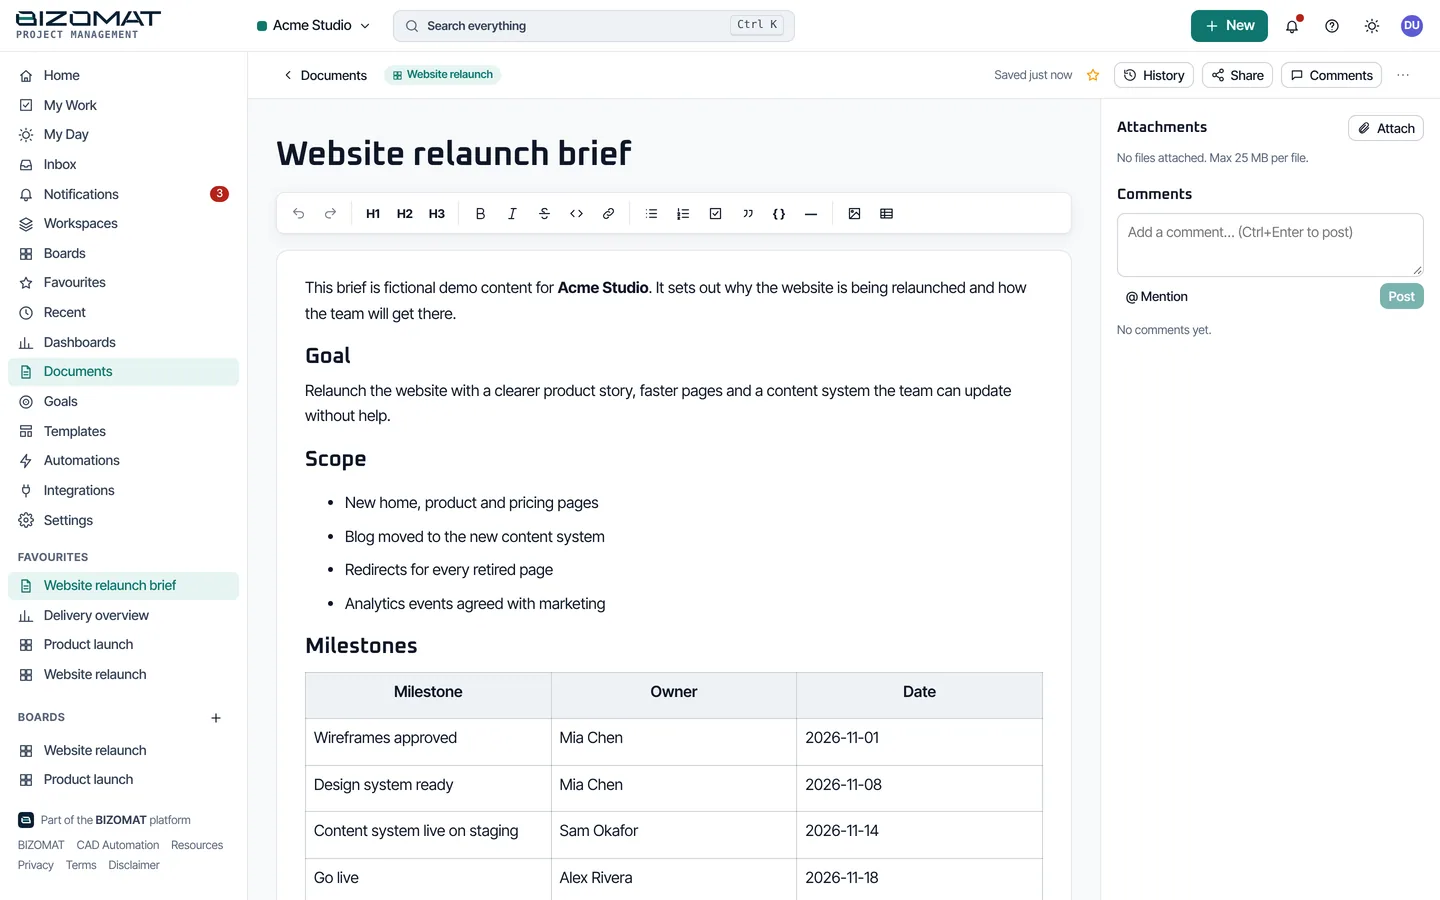
Choose New doc on Home, or open Documents. Documents save as you type, keep their version history and comments, and link to boards and items.
Notifications
Inbox and Notifications show assignments, mentions, replies, status changes, and work due soon or overdue.
Step 8 of 13 Live
Invite people and build teams
Invite someone
Open Settings, Members. Under Invite people, enter the Email address, choose the Role, add a Personal message if you like, and choose Invite.
Email or link
BIZOMAT emails the invitation when its email service is set up. Otherwise it shows the link: copy it and send it yourself. An invitation is valid for 7 days and works once.
Who may invite
Owners, admins and project managers, and members when the workspace allows members to invite.
Pending invitations
Invitations lists the ones not yet accepted. Resend makes a new link, and the earlier one stops working; Revoke cancels an invitation.
In a company
People in a registered company are invited from the company area instead (Administration in the ERP): one invitation sets their Projects role, their roles in the other tools and their departments.
Step 9 of 13 Live
Manage roles and permissions
Access has three layers: the person's role in the workspace, their access to each project, and, where needed, access to a single task.
Workspace roles
Settings, Members: change a person's role, suspend them (they keep their account but cannot open anything until restored) or remove them.
Board members
Choose Members on a board to see and change who works on it. A private board is open only to its members.
Project permissions
In the board's settings, Permissions sets each person's level (manage, edit or view) and switches rights on or off: View financial data, Edit financial data, Manage project members, Create tasks, Assign tasks, Delete tasks and Generate reports.
One task only
An item's Access tab shares that task and its subitems with someone, such as a contractor, without the rest of the project, and sets what they may do.
Audit
Administrators: Settings, Audit trail and Sign-in and settings log record who changed what. Overview & export downloads the workspace as JSON.
The 6 workspace roles
- Owner: Full control: workspace settings, members, finance settings, every project and report.
- Admin: Manages members and settings, creates and manages every project, sees every report.
- Project manager: Creates projects, manages the projects they are given, allocates tasks and generates project reports.
- Member: Works on the workspace's shared projects: updates tasks, comments and uploads files.
- Viewer: Reads and comments on the workspace's shared projects.
- Guest / contractor: Sees only the projects or tasks shared with them, and nothing workspace-wide.
Owners and admins always have every right on every project. Rights on one project can be changed person by person in that board's Permissions.
Step 10 of 13 Live
Plan your own work
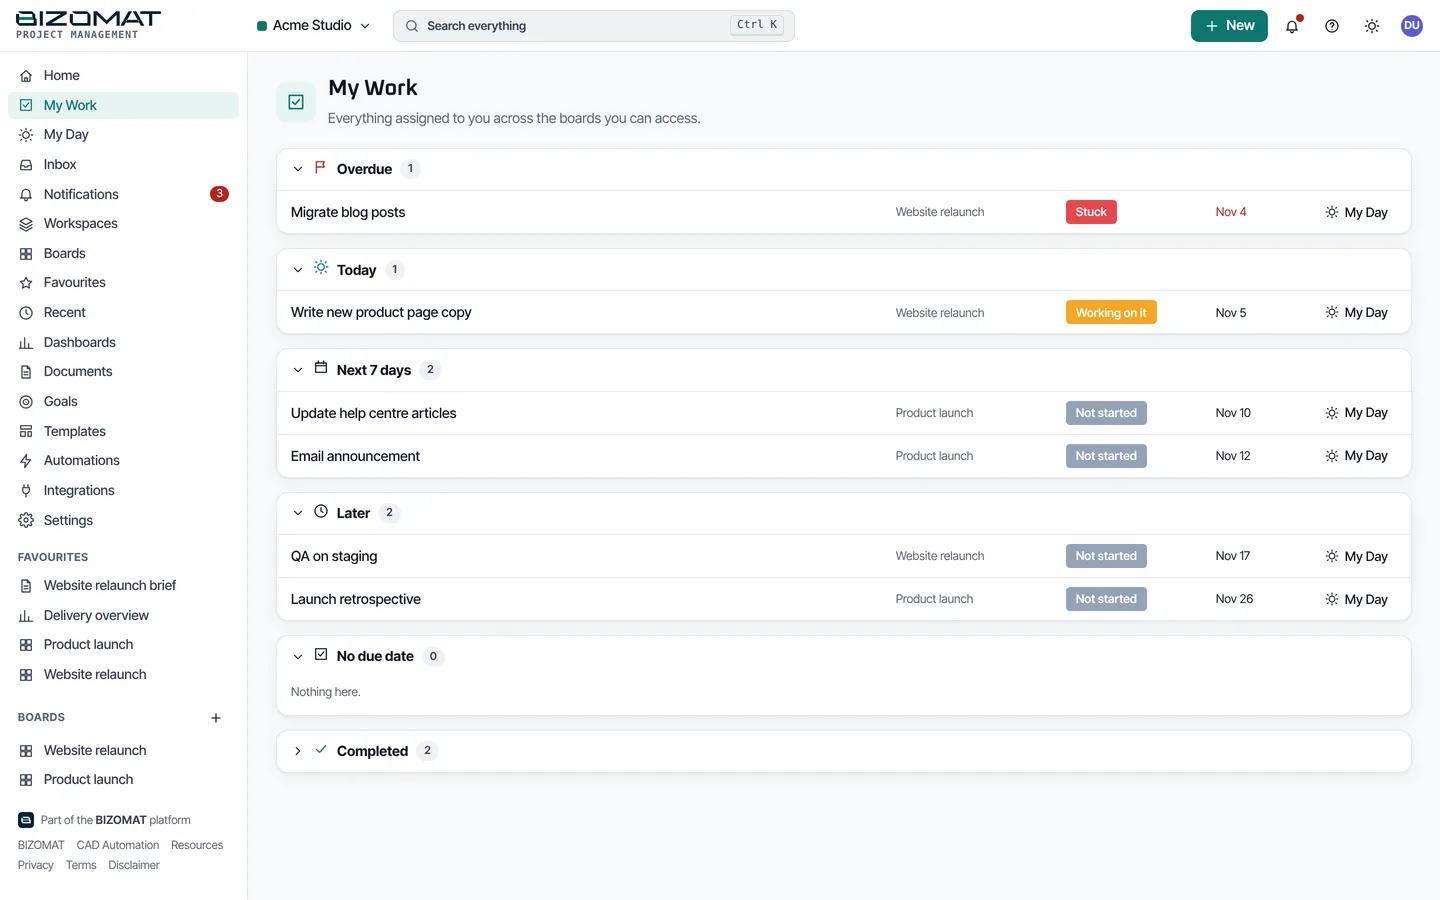
My Work
Everything assigned to you across the boards you can open, grouped by when it is due, and the tasks shared with you.
My Day
Add items to My Day to plan today, and use Weekly planning for the days ahead.
Find anything
Press Ctrl+K (Cmd+K on a Mac) or / to search boards, items, documents and people. Favourites and Recent keep your usual places close.
Step 11 of 13 Live
Automate routine steps
Open the board's automations
Choose Automate on the board, then Add automation, or Recipes for ready-made ones.
When
Pick the trigger: an item is created, a status changes, a column value changes, an item moves to a group, an update is posted, a date arrives, or on a recurring schedule.
Only if
Add conditions if the automation should run only for some items.
Then
Pick one or more actions: set a column value, set a date to today, clear a column, assign someone, move the item to a group, send a notification, create an item or subitem, duplicate or archive the item, or send a webhook.
Save and check
Save automation. Each run is logged on the board. Automations, in the sidebar, lists every automation across your boards and switches them on or off.
Step 12 of 13 Live
Dashboards and reports
New dashboard
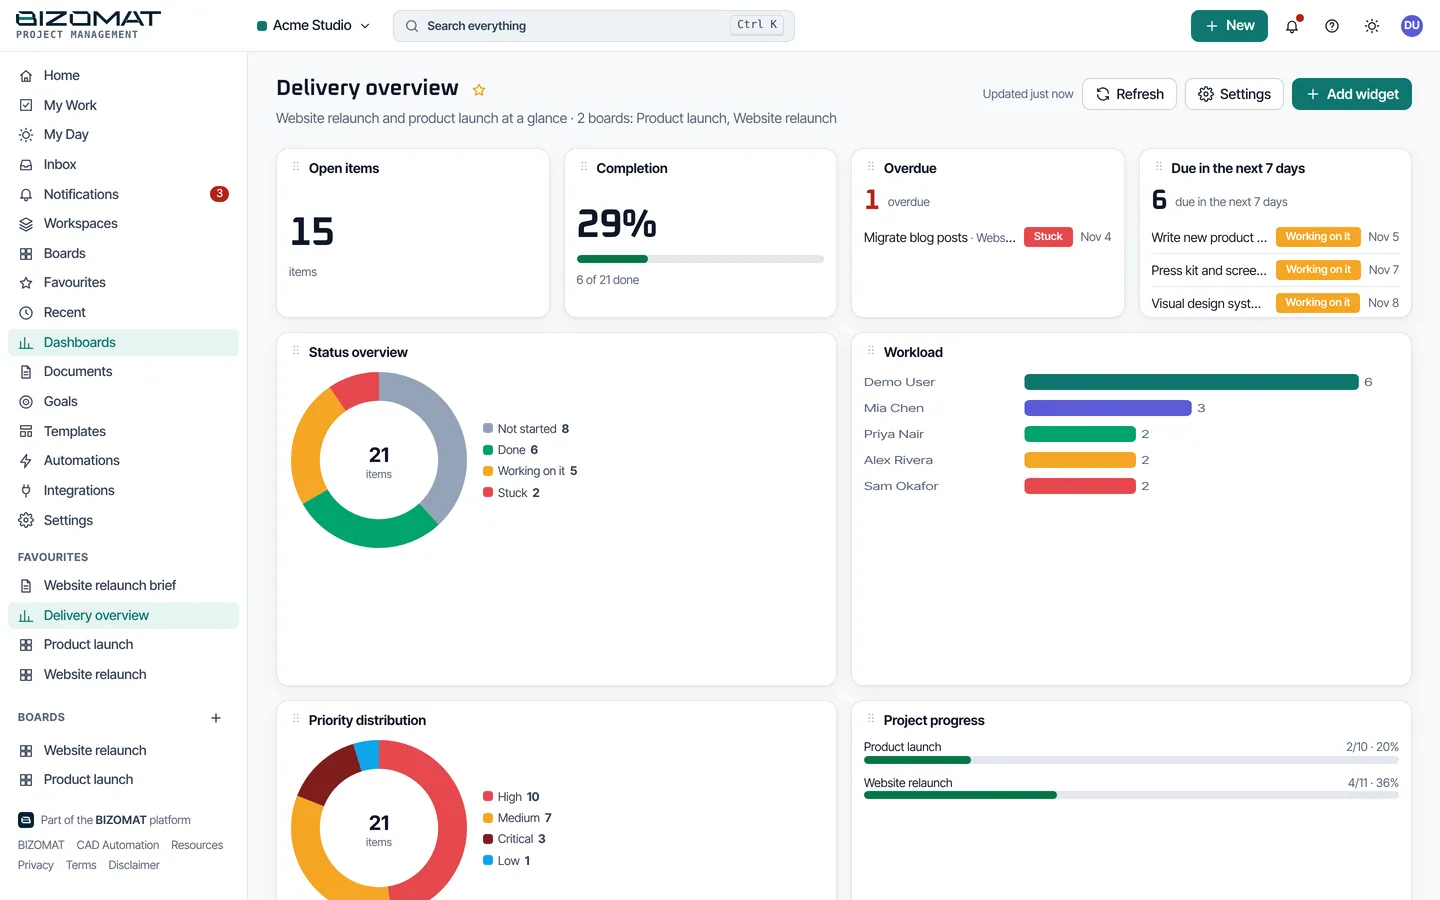
Choose New dashboard on Home or Dashboards, then Add a widget.
Widgets
11 types: Number, chart, task status, priority distribution, completion, workload, overdue work, upcoming deadlines, project progress, activity and time tracking. Choose each widget's source boards, filters and date range, then resize and reorder it.
Project reports
On a board, choose Reports (shown to people who may generate reports). Pick the report type and period, choose the sections, add your commentary, and preview it.
Report types
13 types: Project inception to date, previous month, current month to date, custom date range, monthly progress report, project completion report, financial report, outstanding tasks report, project controls report, critical path report, baseline comparison report, earned value report and project completion forecast.
Save and download
Saving keeps the report as a version with its PDF, Excel, HTML and CSV files, ready to download later.
In the ERP
Reports, in the ERP's rail, lists your Projects dashboards beside the reports of the company's other tools.
Step 13 of 13 Connected
Use it with BIZOMAT CRM, BIZOMAT Finance and your company
Each link checks both systems' own permissions. Links that need a company work when the tools belong to the same registered company.
A CRM follow-up becomes a task
In Sales and CRM, open an activity's menu and choose Create a project task. Pick the project: the task links back to the CRM activity.
A CRM deal starts a project
On a deal, in the section headed Across and your company's name, choose Start a project. A board named after the deal is made in the company's Projects workspace, once per deal. You need a Projects role of member or above.
Project costs and budget
In the company area, open Projects and choose Track in Finance on a project, then set its budget. Income and costs posted to it in Finance show as costs, remaining and income, to people whose Finance role sees reports. Setting up the tracking needs a Finance role that manages accounting.
Departments
A company's departments appear as teams in its Projects workspace.
The ERP Dashboard
Its Projects and Tasks card shows open tasks, overdue, due in 7 days and the number of projects, to people whose role may see them.
Other tools
Integrations, in the sidebar: signed outgoing webhooks, and Slack and Microsoft Teams incoming webhooks, shown as connected only after a delivery succeeds.
Common questions
Before you ask
- Where did Project Management go?
- It is now called BIZOMAT Projects, and it opens inside BIZOMAT ERP under Projects and Tasks. It is the same application, with the same accounts and data.
- Do I need a company account?
- No. Projects works on its own for anyone with a BIZOMAT account. The links to the CRM deals and to Finance tracking need the tools to belong to a registered company.
- Can I work with someone outside my workspace?
- Yes. Invite them as a guest or contractor and share only the project or the single task they need. They see nothing else in the workspace.
- Can I get a deleted or finished board back?
- Archive a board instead of deleting it: archived boards are read-only and hidden from lists, and you can restore them at any time from the Archived tab on Boards.
- How do I move between Projects and the other systems?
- Use the module rail on the left of every screen in BIZOMAT ERP. Your sign-in carries across, and each system keeps its own permissions.
Something not covered here? Read the questions on the BIZOMAT Projects page or contact BIZOMAT.